Profile Searching
Index, retrieve, and display HrFlow.ai's Profile Searching results over 50 data points.
In this article, we'll look at how HrFlow.ai Profile Searching API works by interacting with the endpoint 🧠 Search Profiles indexed in Sources. We will test queries through our public HrFlow.ai Postman collection.
The final goal is to integrate HrFlow.ai into your website structure to deliver fast and personalized Profile Searching experiences.
Prerequisites
API EndpointGet more information about the endpoint 🧠 Search Profiles indexed in Sources.
Step 1: Index Profiles in your Sources
Profiles in HrFlow.ai are indexed in special folders called Sources. To create a source, you can refer to this page 🔌 Create, Configure a Source.
Depending on the nature of your data, indexing a profile can be done through one of the two following ways:
-
From structured information
In the case of highly-structured data, the first step consists of adapting your data to the HrFlow.ai Profile Object format. Please refer to 📖 Profile Object for all the required fields and values structures. Then, using the indexing endpoint, you can index your Profile Object in your desired Source. A complete description of the indexing endpoint can be found at 💾 Index a Profile in a Source. -
From a resume file
Besides structured data, we also have the case of unstructured documents. The most commonly encountered example is raw resumes. These documents need to be parsed by our Parsing API. A complete description of the parsing endpoint can be found at 🧠 Parse a Resume in a Source). Note that the Parsing module structures the CV and automatically indexes it afterward in the specified Source.
Before indexing a profile to our Searching API, it's crucial to ensure its quality and completeness. The following criteria are used to determine whether a profile should be indexed on the Searching engine:
- Personal Information : The profile must contain essential information such as:
- Either an email address or both first name and last name.
- Or at least half of the following fields: phone number, date of birth, gender, summary, URLs, and location.
- Text Field Check : The profile's text must not be empty
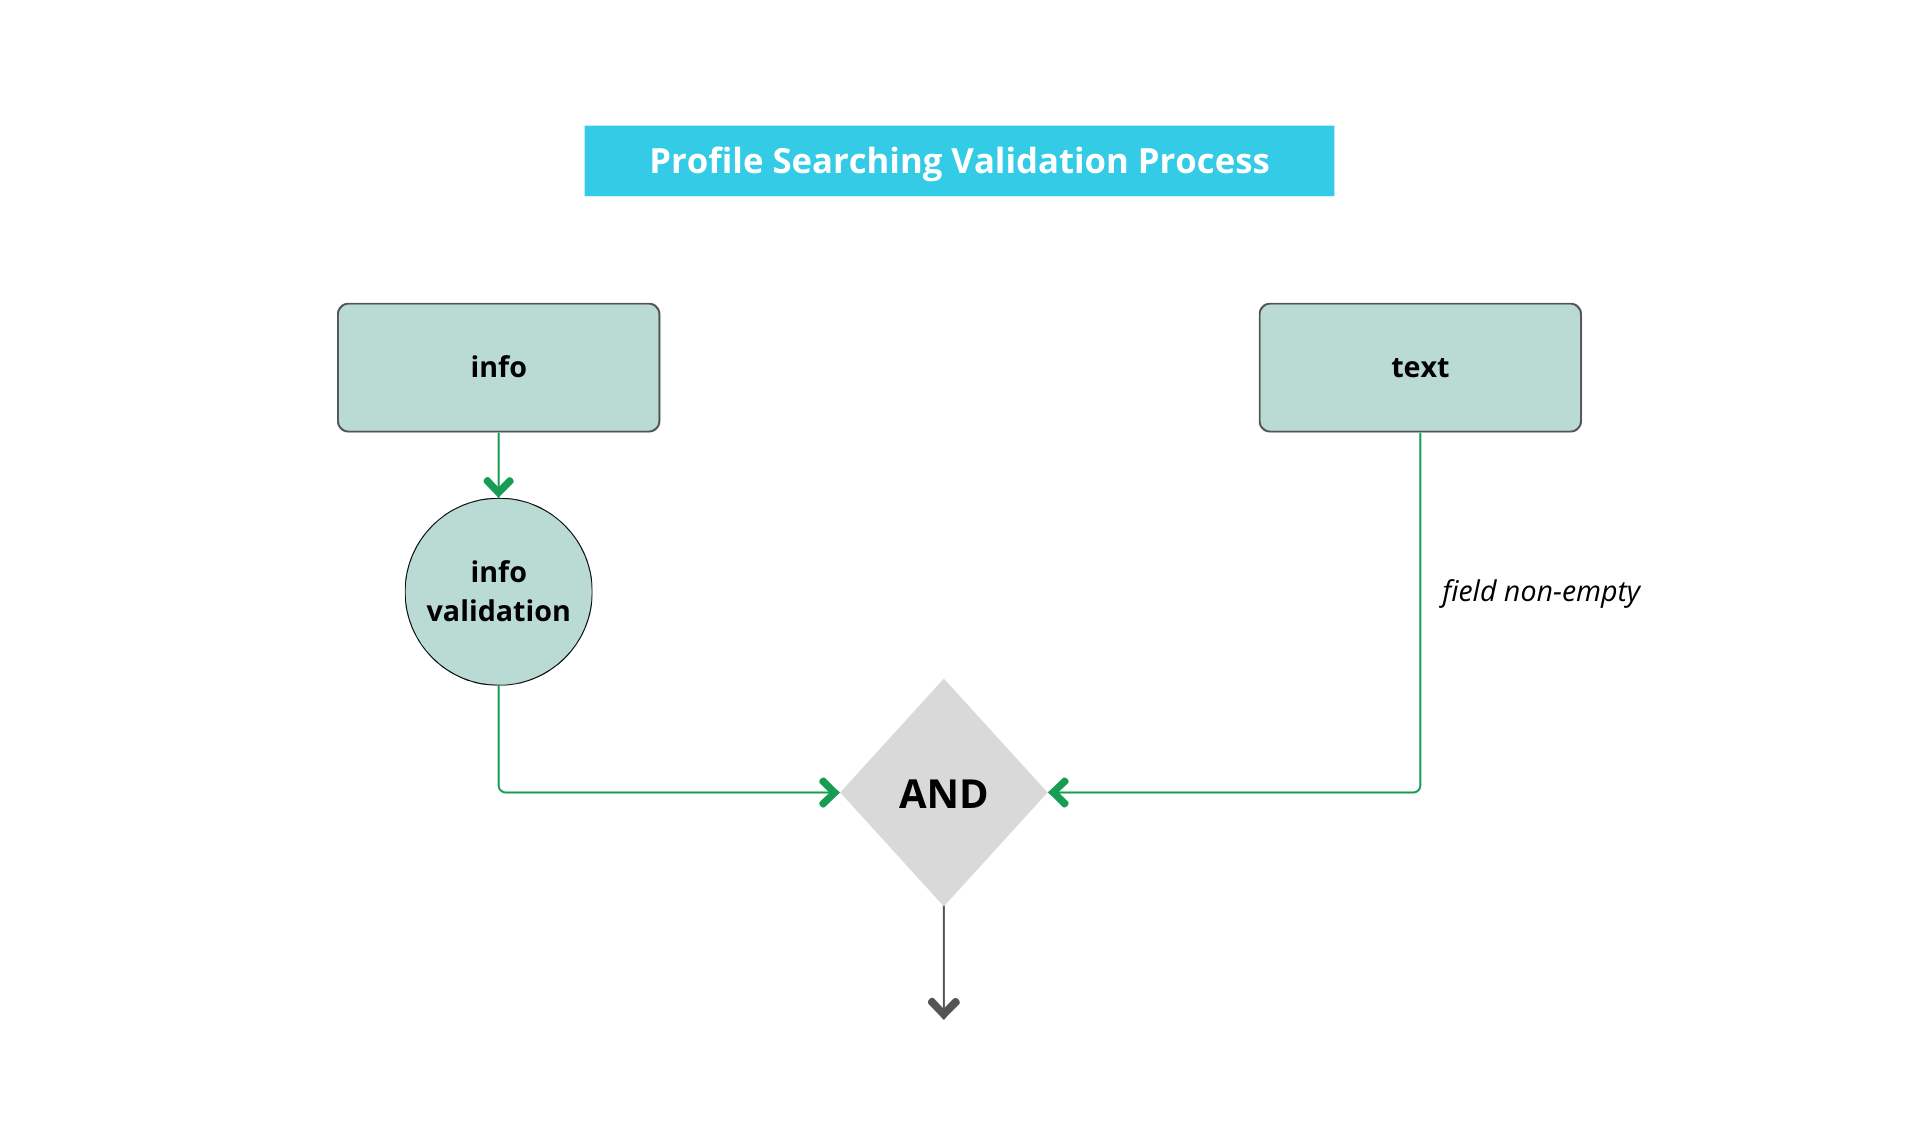
Profile Searching Validation Process
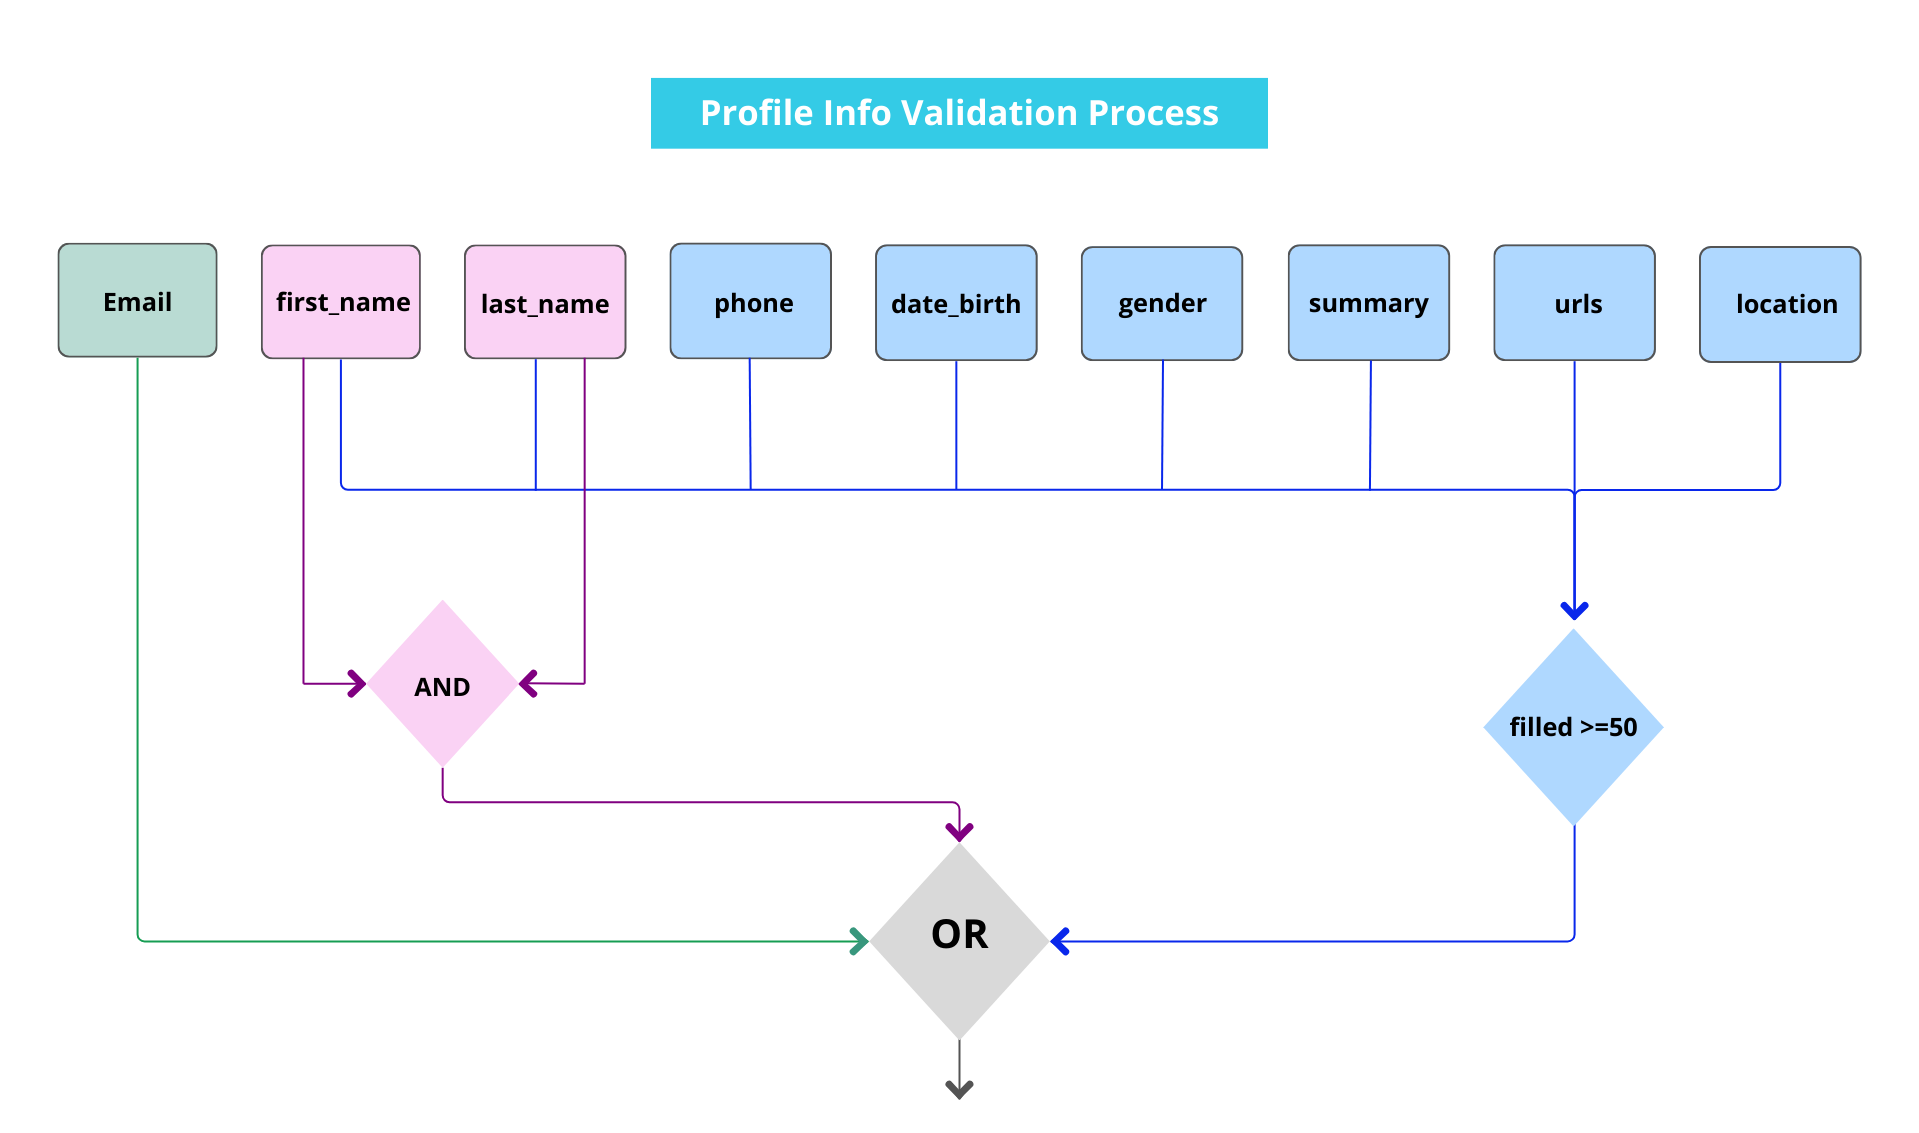
Profile Info Validation Process
Profiles failing to meet both of these criteria will not be indexed in the Searching API.For a profile to be available through the Searching API, it must meet both of these criteria, ensuring that only high-quality and relevant profiles are included in the search results.
Index Profile with a reference
- Specifying a reference eases Profile updates in HrFlow.ai.
- This optional reference uniquely identifies the Profile in HrFlow.ai.
- Profile always has a unique identification key (Profile key) generated by HrFlow.ai.
- Define the granularity of your searching needs
Indexed Profiles in HrFlow.ai must be kept up-to-dateTo prevent outdated results from our Searching API, ensure updating all Profiles on which changes have occurred. Check here for more details on how to 💾 Edit a Profile indexed in a Source.
Step 2: Get your First Searching Results with Postman
We are now ready to use the HrFlow.ai Searching API to make multi-criteria query searches over one or multiple Sources of Profiles.
Let's dig deeper into our Profile Searching endpoint possibilities. In the following, we are going to use our Postman Collection and focus on the endpoint that allows us to 🧠 Search Profiles indexed in Sources.
HrFlow.ai PostmanCheck our publication on HrFlow.ai Postman to get started with our Postman collection.

1. Configure your Postman environment
Following the steps from the HrFlow.ai Postman publication will land you on this page:

First, click on the "Environments" tab on the left side of your Postman window. Then, fill in the Empty - Environment template with the correct values. The compulsory variables for Profile Searching are:
x-api-key: follow the steps from 🔑 API Authentication to retrieve itx-user-email: follow the steps from 🔑 API Authentication to retrieve itsource_key: the Source where your Profiles are located
Finally, save the environment and ensure that you selected Empty - Environment as your current environment.

2. Multiple Criteria Search in a Source
Now that the environment is selected, we can try our first request to Search Profiles in the specified Source by source_key. Let's try a default request:

Now let's add two filters :
Seniority: by specifyingexperiences_duration_min = 4Skills: looking for profiles with Python skills by setting it in the fieldskills, which is a list of objects, see for more details.

Retrieving query results with paginationPagination enables you to have complete control over how you retrieve query results. For example, you can fetch a specific page by using the
pageparameter, which serves as a page offset combined with thelimitparameter that specifies the number of profiles per page.
We strongly recommend using a reasonably low value for thelimitand leveraging the pagination system to retrieve all your queries results.
3. Multiple Criteria Search in Multiple Sources
Now, let's search Profiles in two Sources. To do so, we can simply :
- Add its
source_keyto the list ofsource_keys - Send the request and see the new retrieved hits

For further details on query structure and the different criteria used to filter Profiles in selected Sources, you can refer to 🧠 Search Profiles indexed in Sources.
Sorting Results
- By default, the results are sorted with regards to profiles' creation date:
sort_by=created_at. Thus, the results start from the most recent to the oldest.- Sorting by searching relevance requires at least one criteria.
Step 3: Integrate and Display Profile Searching Results in your Website
You can integrate the overall setup into one place where users can set multi-criteria filters. First, the Profile Searching endpoint is called with the underlying query. Then, the results are displayed in a more user-friendly format.
Here’s a new code demo using Plain HTML, Plain CSS, and Vanilla Javascript showing how to display Profiles in a website page by leveraging HrFlow.ai Profile Searching results.
<div id="app">
  <div class="profiles" id="profiles">
  </div>
</div>
#app {
font-family: -apple-system,system-ui,BlinkMacSystemFont,'Segoe UI',Roboto,Oxygen-Sans,Ubuntu,Cantarell,'Helvetica Neue',sans-serif,'Apple Color Emoji','Segoe UI Emoji','Segoe UI Symbol';
letter-spacing: .01em;
-webkit-font-smoothing: antialiased;
font-feature-settings: 'calt' 0;
overflow-x: hidden;
background: #eee
}
.profiles {
width: 50%;
margin: auto;
padding: 1rem;
display: flex;
flex-wrap: wrap;
justify-content: space-between;
}
.card {
width: 100%;
padding: 1.5rem;
border-radius: 5px;
transition: all 0.2s cubic-bezier(0.41, 0.094, 0.54, 0.07) 0s;
border-width: 1px;
border-style: solid;
border-color: rgb(238, 238, 238);
box-shadow: rgba(0, 0, 0, 0.05) 1px 2px 4px;
backface-visibility: hidden;
background-color: rgb(255, 255, 255);
border-image: initial;
margin-bottom: 1.5rem;
}
.content {
width: 100%;
display: flex;
justify-content: flex-start;
text-decoration: none;
color: #000;
position: relative;
}
.info {
flex: 1 1 auto;
}
.icon {
width: 17px;
height: auto;
margin-right: 0.5rem;
}
.urls {
display: flex;
flex-direction: column;
}
.url {
display: flex;
align-items: center;
text-decoration: none;
color: inherit;
margin-bottom: 0.5rem;
margin-top: 0.5rem;
}
.error {
display: flex;
flex-direction: column;
justify-content: center;
align-items: center;
}
.text-light {
color: #333333;
font-size: 0.9rem;
line-height: 1.5;
opacity: 0.5;
font-weight: normal;
}
.icon {
margin-right: 0.5rem;
}const axiosHrflow = axios.create({
baseURL: 'https://api.hrflow.ai/v1',
headers: {
'X-API-KEY': 'YOUR_SECRET_API_KEY'
}
});
const buildQueryString = (url, queryObject) => {
let queryString = `${url}?`;
Object.keys(queryObject).forEach(item => {
if (typeof queryObject[item] === 'string'
|| queryObject[item] instanceof String) {
queryString += `${item}=${queryObject[item]}&`;
} else {
queryString += `${item}=${JSON.stringify(queryObject[item])}&`;
}
});
return queryString;
}
const displayProfiles = profiles => {
const profilesListHtml = profiles.map(profile => {
const name = profile.info.full_name
const location = profile.info.location.text
const summary = profile.info.summary
const type = profile.tags.filter(tag => tag.name === 'type')[0].value
const category = profile.tags.filter(tag => tag.name === 'category')[0].value
const workingFrom = profile.tags.filter(tag => tag.name === 'working-type')[0].value
const linkedin = profile.info.urls.linkedin
const instagram = profile.info.urls.instagram
const twitter = profile.info.urls.twitter
const position = profile.experiences[0].title
return (
`<div class="card profile" key=${profile.key}>
<h3>${name}</h3>
<div class="info">
<div>worked as ${type}</div>
<div>
${position}
<span class="text-light"> (${category})</span>
</div>
<div>
${location}
<span class="text-light"> (open to ${workingFrom})</span>
</div>
</div>
<div class="urls">
<a href=${linkedin} target="_blank" class="url"}>
<i class="fab fa-linkedin icon"></i>Linkedin
</a>
<a href=${instagram} target="_blank" class="url">
<i class="fab fa-instagram icon"></i>Instagram
</a>
</div>
<div>
<i class="fa fa-star icon"></i><span>${summary}</span>
</div>
</div>
`
)
}).join(' ');
const appElmt = document.getElementById('profiles');
appElmt.innerHTML = profilesListHtml
}
const query = {
job_key: "",
source_keys: ["YOUR_SOURCE_KEY"],
stage: 'new',
sort_by: 'created_at',
order_by: 'desc',
limit: 10,
page: 1,
location_distance: 30,
location_geopoint: {},
use_agent: 0,
text_keywords: [],
tags_included: [[]],
}
const url = buildQueryString('profiles/searching', query);
axiosHrflow.get(url)
.then( res => {
const fetchedProfiles = {
profiles: res.data.data.profiles,
meta: res.data.meta
}
displayProfiles(fetchedProfiles.profiles);
}).catch( err => {
console.log('error', err)
});Advanced Topics
1. Add Custom Attributes
You can further adapt your Profile Object by adding Tags relevant to your business needs. Tags are custom attributes uniquely identified by their name and value. The example below shows how two additional Tags, contract_type and entity, are integrated within a HrFlow.ai Profile Object.
{
  "tags": [
    {
      "name": "contract_type",
      "value": "Full Time"
    },
    {
      "name": "entity",
      "value": "R&D"
    }
  ]
}
{
"key": "8af2b7a0b48fbc936ace283ec020b0d6d4c4b018",
"reference": null,
"consent_algorithmic": {
"owner": {
"parsing": true,
"revealing": false,
"embedding": true,
"searching": true,
"scoring": true,
"reasoning": false
},
"controller": {
"parsing": true,
"revealing": false,
"embedding": true,
"searching": true,
"scoring": true,
"reasoning": false
}
},
"archived_at": null,
"updated_at": "2021-12-10T15:18:46+0000",
"created_at": "2021-12-10T15:18:46+0000",
"info": {
"full_name": "Harry James Potter",
"first_name": "Harry James",
"last_name": "Potter",
"email": "",
"phone": "",
"date_birth": "",
"location": {
"text": "",
"lat": null,
"lng": null,
"gmaps": null,
"fields": []
},
"urls": {
"from_resume": [],
"linkedin": "",
"twitter": "",
"facebook": "",
"github": ""
},
"picture": "",
"gender": "",
"summary": ""
},
"text_language": "en",
"text": "Harry James Potter",
"experiences_duration": 0,
"educations_duration": 0,
"experiences": [],
"educations": [],
"attachments": [],
"skills": [],
"languages": [],
"certifications": [],
"courses": [],
"tasks": [],
"interests": [],
"labels": [],
"tags": [
{
"name": "archive",
"value": false
},
{
"name": "contract_type",
"value": "Full Time"
},
{
"name": "entity",
"value": "R&D"
}
],
"metadatas": []
}2. Try it in your Favorite Programming Language
You might want to try the same experience in your favorite programming language. Luckily, Postman automatically provides us with the correct code corresponding to the request in several programming languages.
All you have to do is :
- Go to the code tab in the upper right corner,
- Then select your target programming language from the dropdown,
And voilà, all you have to do now is copy and paste this code and try it out straight away.

3. Customizing Profile Search Results with raw_filters Request Parameter.
raw_filters Request Parameter.The raw_filters parameter in HrFlow.ai’s Profile Searching API allows for advanced, highly customizable search queries by directly inputting Elasticsearch syntax.
This flexibility is invaluable for scenarios requiring complex filtering, scoring, and sorting beyond standard query parameters. Here, we explore two practical examples demonstrating how to leverage raw_filters for powerful multi-criteria searches.
Example 1: Filtering by Provider and Multi-Skill Search with OR Logic
In this example, we aim to find profiles associated with a specific provider and containing either "Python" or "Java" in their text fields. The should clause in the raw_filters parameter enables us to use OR logic, returning profiles that match at least one of the specified skills.
raw_filters = {
    "query": {
        "bool": {
            "should": [
                {
                    "match_phrase": {
                        "text": "Python",
                    }
                },
                {
                    "match_phrase": {
                        "text": "Java",
                    }
                }
            ]
        }
    }
}
Explanation:
- Skill Matching with OR Logic: The
shouldclause contains twomatch_phrasequeries for the terms "Python" and "Java." This configuration allows to return Profiles that contain either "Python" or "Java" in thetextfield. Profiles matching both terms will have a higher relevance score. - Fields Specification: The query targets the
textfield exclusively, making it simpler and more focused compared to queries that might target multiple fields. This ensures the search is restricted to a specific field where the relevant content is expected. - Phrase Match: The match_phrase query ensures that the Searching API searches for the exact phrases "Python" and "Java," preserving the order and adjacency of the terms in the field. This is particularly useful for precise phrase-based matching, avoiding partial matches or term disassociation.
Example 2: Combining Geo-Distance and Multi-Skill Requirements with AND/OR Logic
In this second example, we demonstrate a complex query combining geo-location filtering and specific skills requirements. The goal is to retrieve profiles:
- Located within 50 kilometers of Paris.
- Having skills in either "python" or "java".
The must clause enforces an AND relationship between geo-distance and skills criteria, while the nested should clause within skills enables an OR condition between "python" and "java".
raw_filters = {
    "query": {
        "bool": {
            "must": [
                {
                    "nested": {
                        "path": "experiences",
                        "query": {
                            "geo_distance": {
                                "distance": "50km",
                                "experiences.location": {"lat": 48.8566, "lon": 2.3522}
                            }
                        }
                    }
                },
                {
                    "bool": {
                        "should": [
                            {
                                "nested": {
                                    "path": "skills",
                                    "query": {
                                        "bool": {
                                            "must": [
                                                {"match": {"skills.name": "python"}}
                                            ]
                                        }
                                    }
                                }
                            },
                            {
                                "nested": {
                                    "path": "skills",
                                    "query": {
                                        "bool": {
                                            "must": [
                                                {"match": {"skills.name": "java"}}
                                            ]
                                        }
                                    }
                                }
                            }
                        ]
                    }
                }
            ]
        }
    }
}
Explanation:
- Geo-Distance Filtering: The
geo_distancequery, nested under experiences, limits results to profiles with experiences located within 50 km of Paris. - Skill Requirements with AND/OR Logic: The must clause ensures both geo-location and skills criteria are met, while the nested should clause allows for profiles with either "python" or "java" as skills.
Running raw_filters Profile Searching Request in Postman
raw_filters Profile Searching Request in PostmanTo test the raw_filters parameter in HrFlow.ai's Profile Searching API through Postman, follow these steps:
- Step 1: Open the HrFlow.ai Collection: Start by navigating to the HrFlow.ai Public Workspace in Postman. Under the Profile section, select the 🧠 Search Profiles indexed in Sources endpoint.
- Step 2: Set Up the Environment: Make sure you have an environment configured in Postman with variables such as
x-api-key,x-user-email, andsource_key. These variables are essential for authentication and targeting specific sources for profile searching. - Step 3: Add
raw_filtersParameter: In the request parameters, add theraw_filtersfield. Paste yourraw_filtersJSON configuration in the value field. For example, to search for profiles with "python" or "java" in the text fields, you would use:
{"query":{"bool":{"should":[{"match_phrase":{"text":"Python"}},{"match_phrase":{"text":"Java"}}]}}}- Step 4: Configure Additional Parameters: You can also set other parameters, such as page to control pagination, limit to define the number of results per page, and
sort_byto sort results by criteria likecreated_at. - Step 5: Send the Request: Click Send to execute the request. The response section will display the matching profiles based on the
raw_filterscriteria.
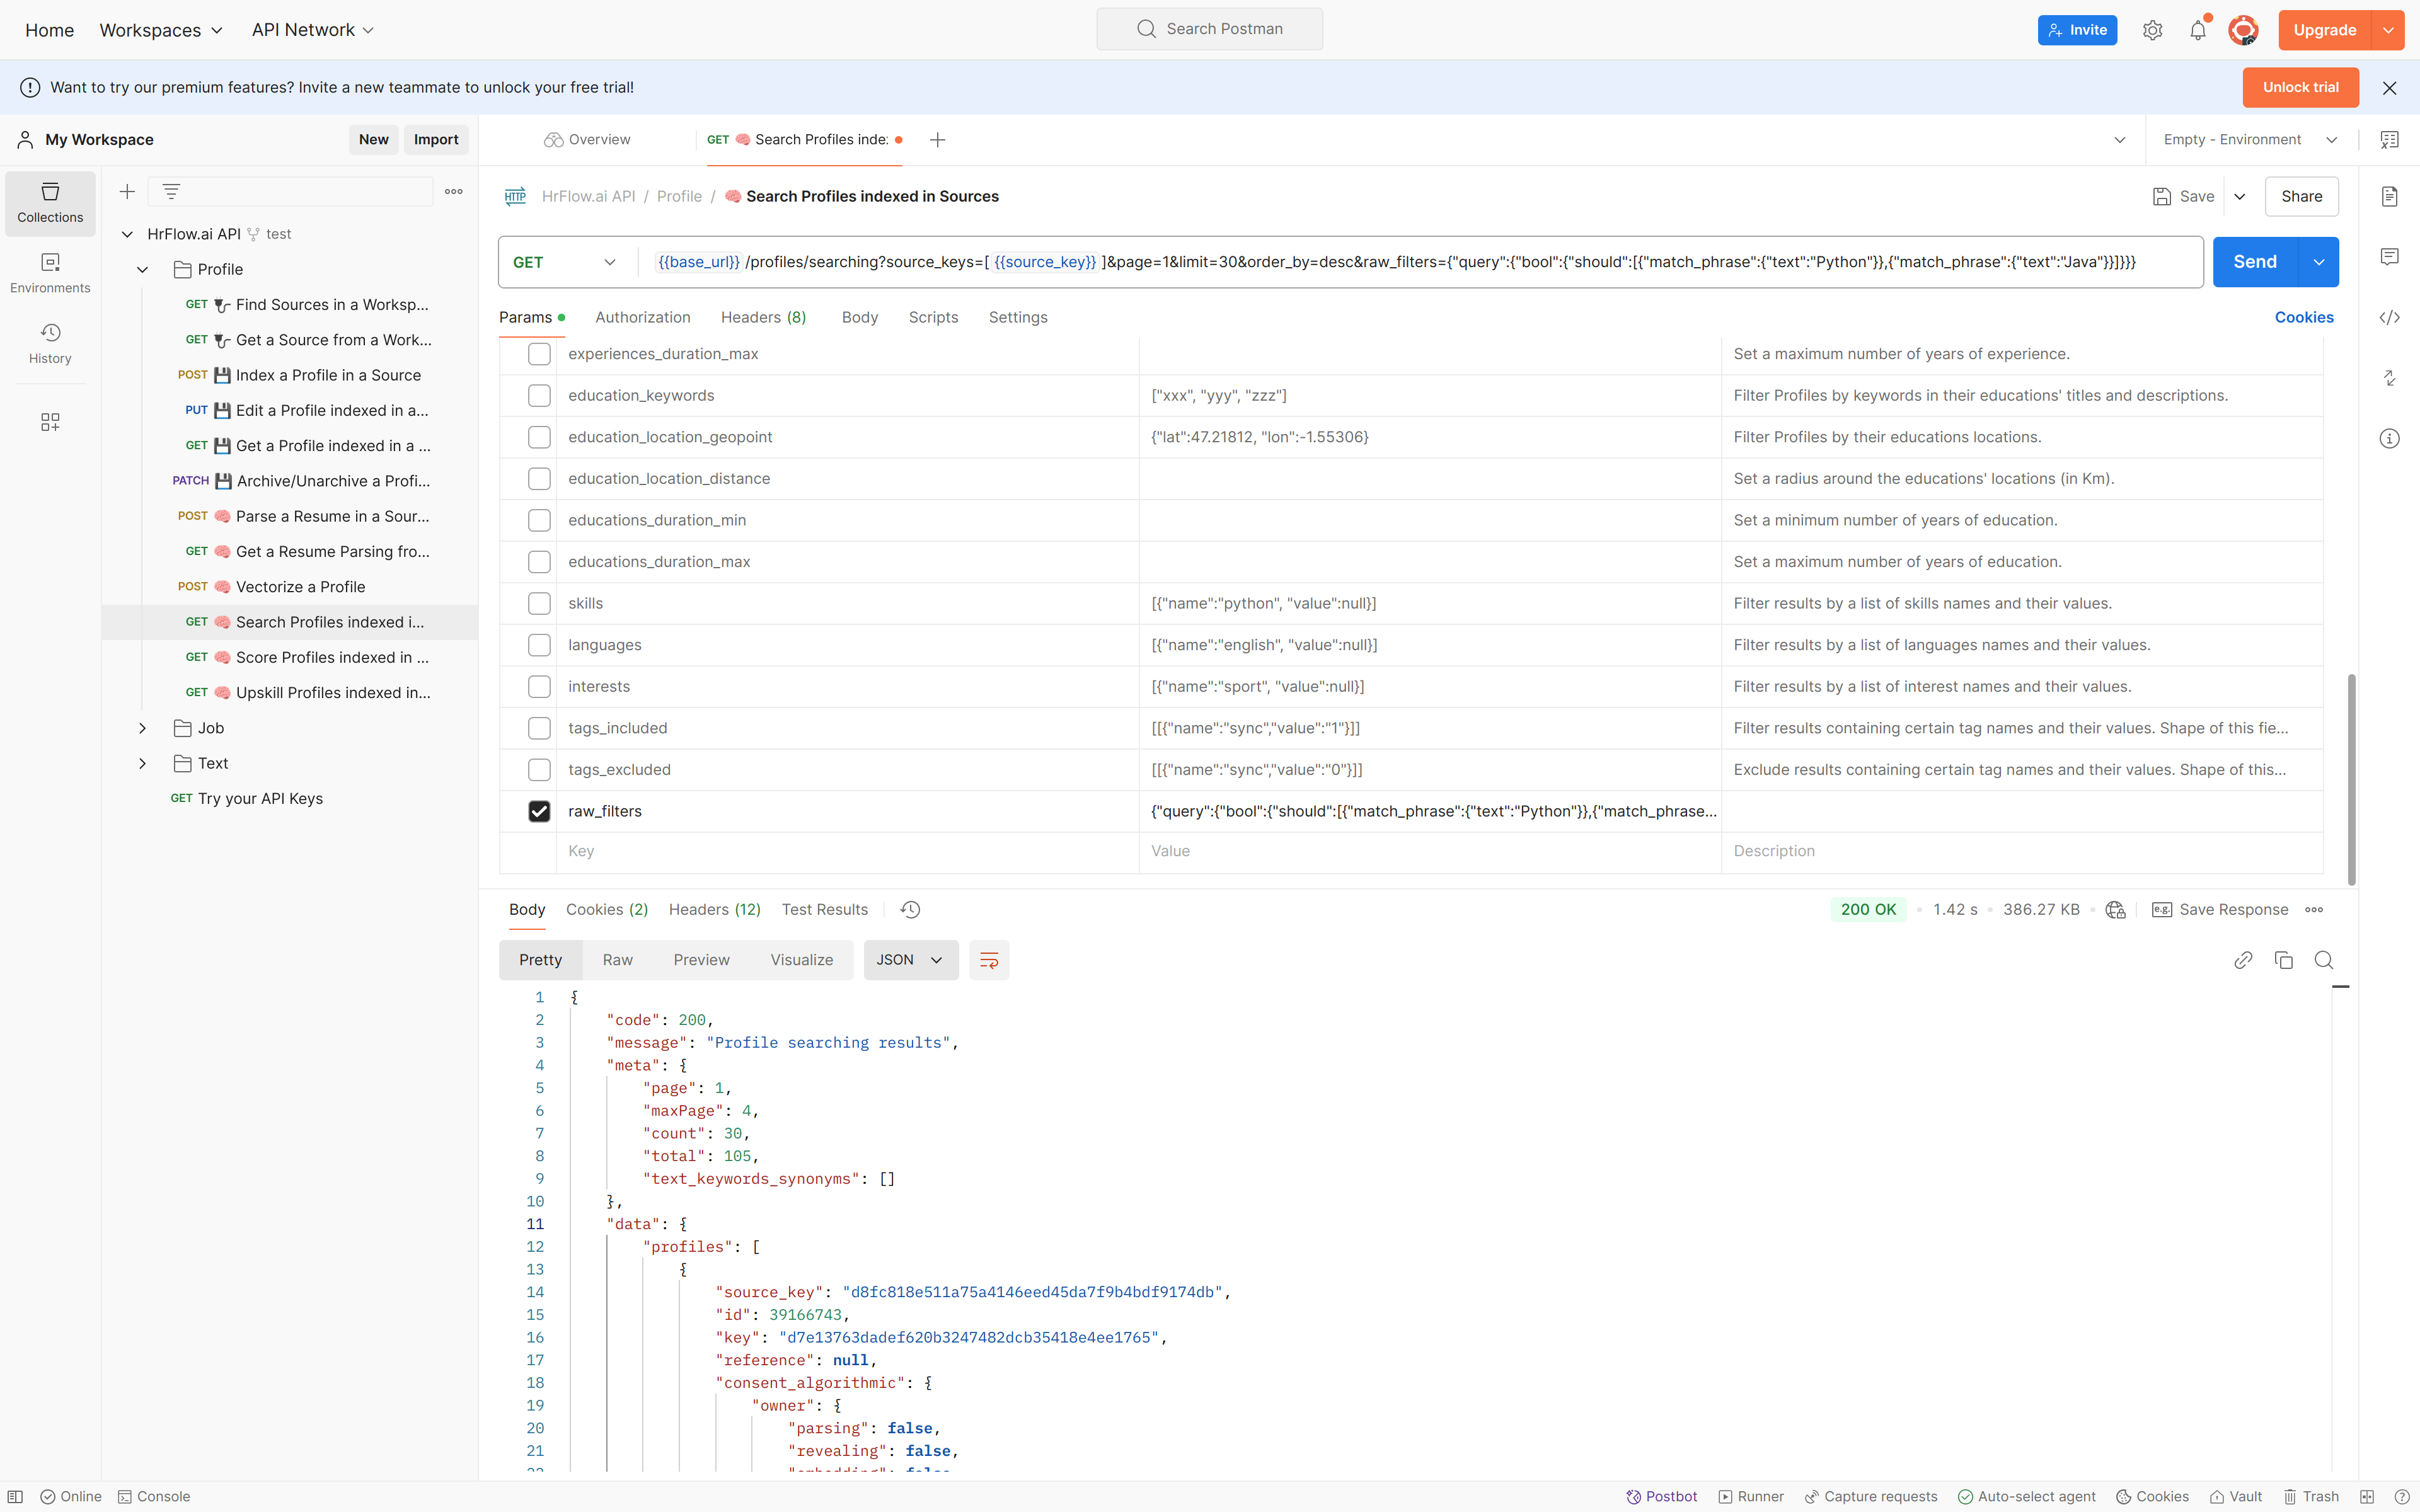
Using Postman to test raw_filters allows you to fine-tune your search query, adjust filters, and ensure the API returns the desired results before integrating it into your application. This setup is especially useful for debugging and validating complex, multi-criteria queries.
Updated about 1 year ago