⬅️ Send data from HrFlow.ai into a Tool
Learn how to sync Talent data from HrFlow.ai into a Destination.
The new HrFlow.ai Workflows feature allows you to synchronize a set of data between your databases and the HrFlow.ai servers. Whether you need to continuously run some routines or have a triggered execution both scenarios are possible with Workflows.
This page will be dedicated to the sending of data from HrFlow.ai to a tool of your company (for example an ATS).
RemarkThe data synchronized here will be profiles, but this also applies very well to jobs.
PrerequisitesTo fully understand this part, it is necessary to have read the following pages:
Case study 1: Sending a Profile's application from HrFlow.ai to a messaging service

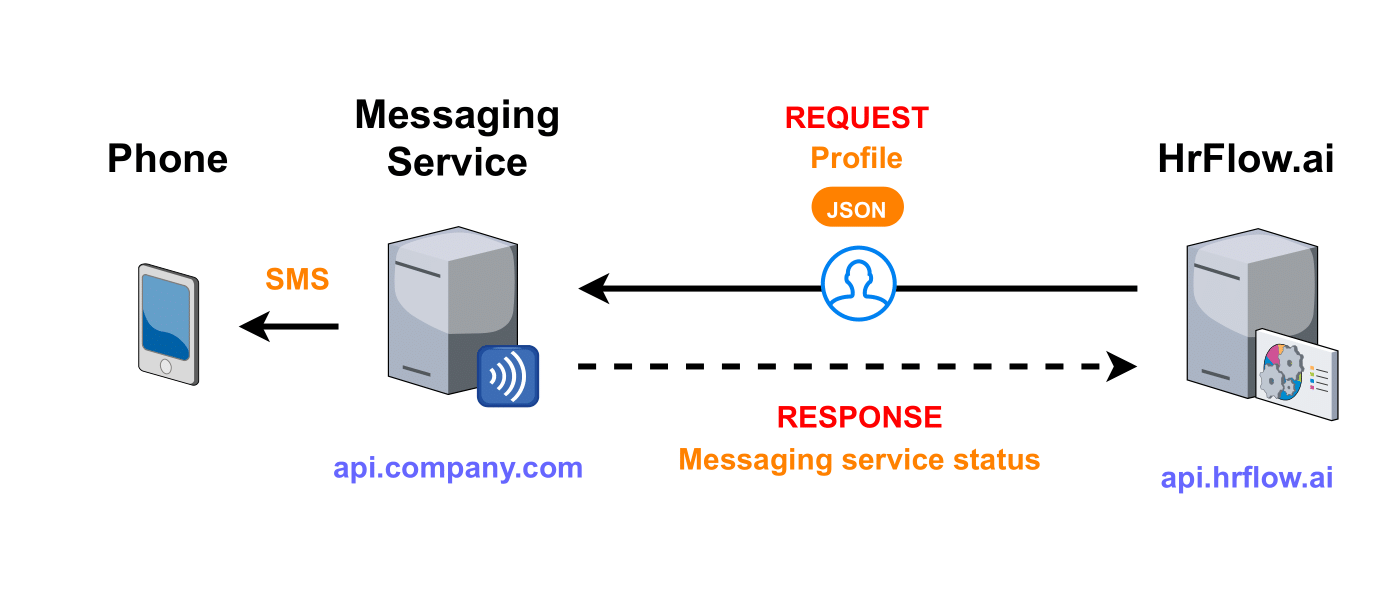
This diagram illustrates the communication between your company's messaging Service and HrFlow.ai
Step 1: Choosing the Trigger
To make the case study generic and keep it as simple as possible, we will communicate with a tool created for the demonstration.
Let's consider the communication between HrFlow and a messaging service to send SMS. We want that when a profile is indexed in a HrFlow Source, an SMS is sent to the HR of your company to inform him that a person has applied for a job. To do this, we need to communicate with a message sending service hosted on api.company.com.
The following endpoint on the messaging service side:
Type | Value |
|---|---|
|
|
HEADER |
|
BODY |
|
Authentication
X-API-KEYvalue is an authentication token provided by the service.
If all goes well, the server responds with a 200 request (SUCCESS).
Step 2: Catching the POST request sent by the HrFlow Webhook when a profile is indexed
You need to:
- Create a CATCH workflow
- Go to Connectors Marketplace, in the Destinations section, create a "Webhook".
- Go to the Settings of the Webhook and add the URL of the CATCH workflow in a line with the type
profile.indexing.success.
For more information
Step 3: Building the Automation logic
It's time to code the internal logic of the Workflow.
When a profile is indexed in a Source, a notification is sent by the Webhook which will launch the CATCH workflow. The _request parameter of the workflow contains the profile key. We will use it to retrieve the profile information (like name, first name, and phone number).
📖 The Profile Object
Workflow
import json
from hrflow import Hrflow
import requests

def workflow(_request, settings):
    client = Hrflow(api_secret=settings["API_KEY"], api_user=settings["USER_EMAIL"])

    profile_key = _request["profile"]["key"]
    source_key = _request["profile"]["source"]["key"]

    # Get profile
    hrflow_profile_response = hrflow_api.profile.indexing.get(source_key=webhook_dto.source_key, key=webhook_dto.profile_key)

    profile = hrflow_profile_response.get("data")
    firstname = profile["info"]["first_name"]
    lastname = profile["info"]["last_name"]
    phone = profile["info"]["phone"]

    # Send message
    headers = {
      'Content-Type': 'application/json',
      'x-api-key': settings["MESSAGE_API_KEY"]
    }

    message = "{firstname} {lastname} just applied ! Send a message to {phone}."
    body = dict(text=message.format(firstname=firstname, lastname=lastname, phone=phone))

    response = requests.post(settings["MESSAGE_URL"], headers=headers, data=body)

    if response.status_code != 200:
        raise ConnectionError("Messaging server does not want to send the message !")

    return dict(
        status_code=201,
        headers={"Content-Type": "application/json"},
        body=json.dumps({"message": "Message sent successfully !"})
    )
Don't forget to set the environment properties !In the environment properties, the following constants must be defined in order to use them with the
settingsparameter of the workflow function:
API_KEYUSER_EMAILMESSAGE_API_KEYMESSAGE_URLwithhttps://api.company.com/smsTo know more about it : HrFlow.ai Workflows
Step 4: Testing the Workflow
In this part, we will build a wrapper to launch the workflow on a test environment.
Your environment
Your test environment must be under Python 3.6.
The allowed packages are :
hrflow==1.8.7requests==2.24.0selenium==3.141.0twilio==6.46.0scipy==1.5.1numpy==1.19.0mailchimp-transactional==1.0.22
You will find them in My Workflows > YOUR_WORKFLOW_NAME > Function > Function Code > Allowed packages.
The code is very simple:
request = dict()
request["type"] = "profile.indexing.success"
request["origin"] = "api"
request["message"] = "Profile indexing succeed"
request["profile"] = {"key":"PROFILE_KEY","source":{"key":"SOURCE_KEY"}}

settings = {
     "API_KEY":"YOUR_API_KEY",
     "USER_EMAIL":"YOUR_USER_EMAIL",
     "MESSAGE_API_KEY":"MESSAGE_API_KEY",
     "MESSAGE_URL":"https://api.company.com/sms"
 }

workflow(request, settings)
Storing API KEYInstead of storing
API_KEYin plain text, you can usegetpass.getpass("Your API KEY:")import getpass settings = { "API_KEY":getpass.getpass("Your API KEY:"), "USER_EMAIL":"YOUR_USER_EMAIL", "MESSAGE_API_KEY":getpass.getpass("Your Message Service API KEY:"), "MESSAGE_URL":"https://api.company.com/sms" }
Step 5: Deploying the Workflow
All you need to do is:
- Paste the code in My Workflows > YOUR_WORKFLOW_NAME > Function > Function Code.
- Define the environment variables in My Workflows > YOUR_WORKFLOW_NAME > Function > Function Code > Environment properties.
- Deploy
For more information
Step 6: Monitoring the Workflow
This feature is coming soon !
Case study 2: Migrating a Profile database from HrFlow.ai to an ATS

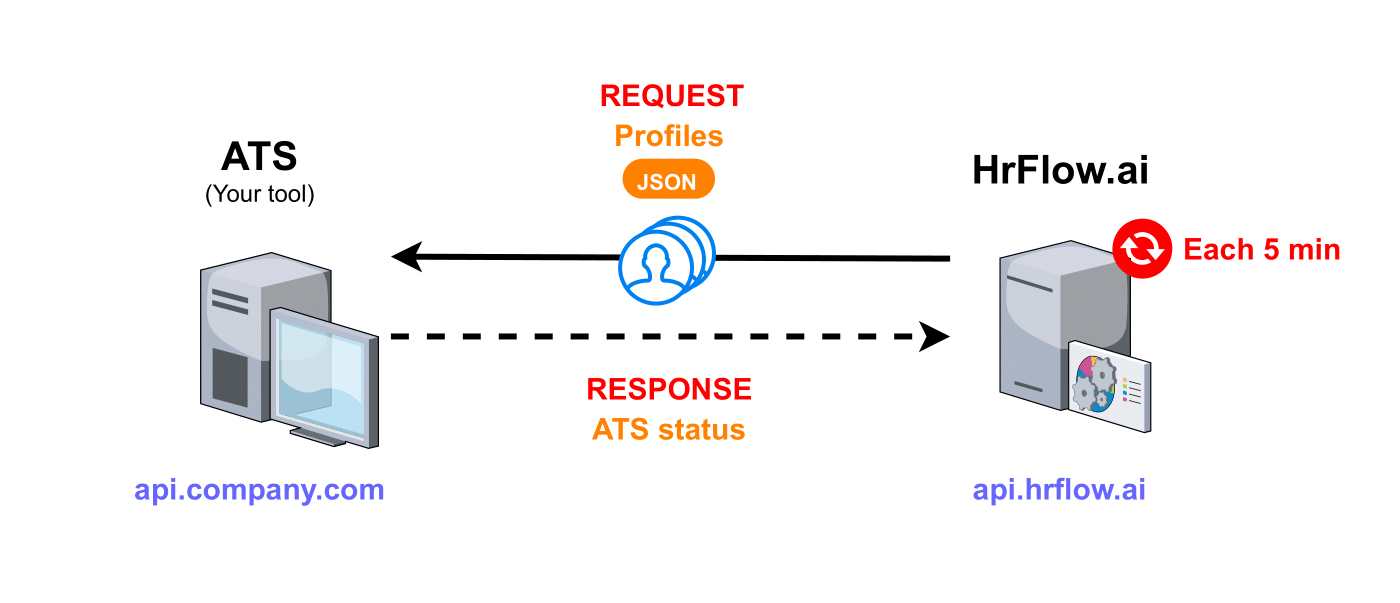
This diagram illustrates the communication between your company's ATS and HrFlow.ai
Step 1: Choosing the Trigger
Step 2: Building the Automation logic
Let's define the following instance:
from hrflow import Hrflow
import requests
client = Hrflow(api_secret=API_KEY, api_user=USER_EMAIL)
A. It is necessary to get all the profiles of the Board without tag "sync"
searching_response = client.profile.searching.list(source_keys=[SOURCE_KEY], page=1, limit=30, tags_excluded=[[{"name":"sync","value":"1"}]])
if searching_response["code"] != 200:
    raise ConnectionError("Hrflow.ai server does not want to response !")
profile_list = searching_response["data"]["profiles"]
B. Convert the Hrflow.ai profiles into usable objects in the request to the ATS
ats_profile_dict_list = []
for profile in profile_list:
    profile_dict = dict()
    profile_dict["first_name"] = profile["info"]["first_name"]
    profile_dict["last_name"]  = profile["info"]["last_name"]
    profile_dict["email"]  = profile["info"]["email"]
    profile_dict["phone"]  = profile["info"]["phone"]
    profile_dict["date_birth"]  =profile["info"]["date_birth"]
    profile_dict["gender"]  = profile["info"]["gender"]
    profile_dict["summary"]  = profile["info"]["summary"]

    ats_profile_dict_list.append(profile_dict)
C. Send the request to add a profile to the ATS
headers = {
  'Content-Type': 'application/json',
  'x-api-key': ATS_API_KEY
}

body = dict(jobs=ats_profile_dict_list)

response = requests.post(ATS_URL, headers=headers, data=body)
if response.status_code != 200:
    raise ConnectionError("ATS server does not want to add profiles !")
D. Add a "sync" tag to all sent profiles
for profile in profile_list:
    tag_sync = dict(name="sync", value="1")
    profile.get("tags", []).append(tag_sync)
E. Edit each profile in the source
for profile in profile_list:
    profile_key = profile["key"]
    edit_response = client.profile.indexing.edit(source_key=SOURCE_KEY, key=profile_key, profile_json=profile)
    if edit_response["code"] != 200:
        raise ConnectionError("Hrflow.ai server does not want to edit profile !")
The tag "sync" is used to indicate that the profile has already been synchronized with the ATS. If the tag is missing from the profile, then the profile has not yet been processed and therefore not yet sent.
Step 3: The workflow
from hrflow import Hrflow
import requests
def workflow(settings):
    client = Hrflow(api_secret=settings["API_KEY"], api_user=settings["USER_EMAIL"])

    # Get all the profiles of the Board without tag "sync"
    searching_response = client.profile.searching.list(source_keys=[settings["SOURCE_KEY"]], page=1, limit=30, tags_excluded=[[{"name":"sync","value":"1"}]])
    if searching_response["code"] != 200:
        raise ConnectionError("Hrflow.ai server does not want to response !")
    profile_list = searching_response["data"]["profiles"]

    # Convert the Hrflow.ai profiles into usable objects in the request to the ATS
    ats_profile_dict_list = []
    for profile in profile_list:
        profile_dict = dict()
        profile_dict["first_name"] = profile["info"]["first_name"]
        profile_dict["last_name"]  = profile["info"]["last_name"]
        profile_dict["email"]  = profile["info"]["email"]
        profile_dict["phone"]  = profile["info"]["phone"]
        profile_dict["date_birth"]  =profile["info"]["date_birth"]
        profile_dict["gender"]  = profile["info"]["gender"]
        profile_dict["summary"]  = profile["info"]["summary"]

        ats_profile_dict_list.append(profile_dict)

        # Add a “sync” tag to all sent profiles
        tag_sync = dict(name="sync", value="1")
        profile.get("tags", []).append(tag_sync)

    # Send the request to add a profile to the ATS
    headers = {
      'Content-Type': 'application/json',
      'x-api-key': settings["ATS_API_KEY"]
    }

    body = dict(jobs=ats_profile_dict_list)

    response = requests.post(settings["ATS_URL"], headers=headers, data=body)
    if response.status_code != 200:
        raise ConnectionError("ATS server does not want to add profiles !")

    # Edit each profile in the source
    for profile in profile_list:
        profile_key = profile["key"]
        edit_response = client.profile.indexing.edit(source_key=settings["SOURCE_KEY"], key=profile_key, profile_json=profile)
        if edit_response["code"] != 200:
            raise ConnectionError("Hrflow.ai server does not want to edit profile !")
Don't forget to set the environment properties !In the environment properties, the following constants must be defined in order to use them with the
settingsparameter of the workflow function:
API_KEYUSER_EMAILSOURCE_KEYATS_API_KEYATS_URLwithhttps://api.company.com/profilesTo know more about it : HrFlow.ai Workflows
Step 4: Testing the Workflow
In this part, we will build a wrapper to launch the workflow on a test environment.
Your environment
Your test environment must be under Python 3.6.
The allowed packages are :
hrflow==1.8.7requests==2.24.0selenium==3.141.0twilio==6.46.0scipy==1.5.1numpy==1.19.0mailchimp-transactional==1.0.22
You will find them in My Workflows > YOUR_WORKFLOW_NAME > Function > Function Code > Allowed packages.
The code is very simple:
settings = {
     "API_KEY":"YOUR_API_KEY",
     "USER_EMAIL":"YOUR_USER_EMAIL",
     "SOURCE_KEY":"YOUR_SOURCE_KEY",
  	 "ATS_API_KEY":"YOUR_ATS_SOURCE_KEY"
     "ATS_URL":"https://api.company.com/profiles"
 }

workflow(settings)
Storing API KEYInstead of storing
API_KEYin plain text, you can usegetpass.getpass("Your API KEY:")import getpass settings = { "API_KEY": getpass.getpass("Your API KEY:"), "USER_EMAIL":"YOUR_USER_EMAIL", "SOURCE_KEY":"YOUR_SOURCE_KEY", "ATS_API_KEY":getpass.getpass("Your ATS API KEY:") "ATS_URL":"https://api.company.com/profiles" }
Step 5: Deploying the Workflow
All you need to do is:
- Paste the code in My Workflows > YOUR_WORKFLOW_NAME > Function > Function Code.
- Define the environment variables in My Workflows > YOUR_WORKFLOW_NAME > Function > Function Code > Environment properties.
- Deploy
For more information
Step 6: Monitoring the Workflow
This feature is coming soon !
Updated 8 months ago
