
Tagging API
Tag any text with a taxonomy without writing a line of code.
The Text Tagging API assigns the most relevant tags of a taxonomy to any text: a job description, a resume, a profile, a single work experience. It powers search filters, data normalization, missing-skill prediction and analytics on your HR data.
Every tagger is built around a taxonomy that lives in your workspace. There are two ways to get one:
| Approach | When to use it | What you need |
|---|---|---|
| Create a taxonomy from the Marketplace | You want a standard referential: ROME 4.0 job classification, skills, seniority, degree, contract type | Create a taxonomy from the Marketplace, adjust it if it is editable, then create a Tagging Algorithm on it |
| Create your own taxonomy | You have an internal referential: job families, business lines, competencies, schools… | Create the taxonomy and its tags, then create a Tagging Algorithm on it |
This article walks you through both, from your dashboard, and then shows how to call your tagger with the endpoint 🧠 Tag a Text through our public HrFlow.ai Postman collection. If you only need to sort texts into a handful of labels without a taxonomy, jump to the Dynamic Tagger in the Advanced Topics.
API EndpointGet more information about the endpoint 🧠 Tag a Text.
Vocabulary
- A taxonomy is a named referential, for example Job Families or Skills.
- A tag is one value of a taxonomy, for example Data Engineering. It has a technical value (returned in
ids), a label (returned intags) and a description.- A Tagging Algorithm is the tagger. It links one taxonomy to one of our tagging models and carries the
algorithm_keyyou call.
Step 1: Get a taxonomy in your workspace
Open Left Sidebar > Connections > My Taxonomies. This page lists the taxonomies of your workspace and lets you create a taxonomy from the Marketplace or create your own.
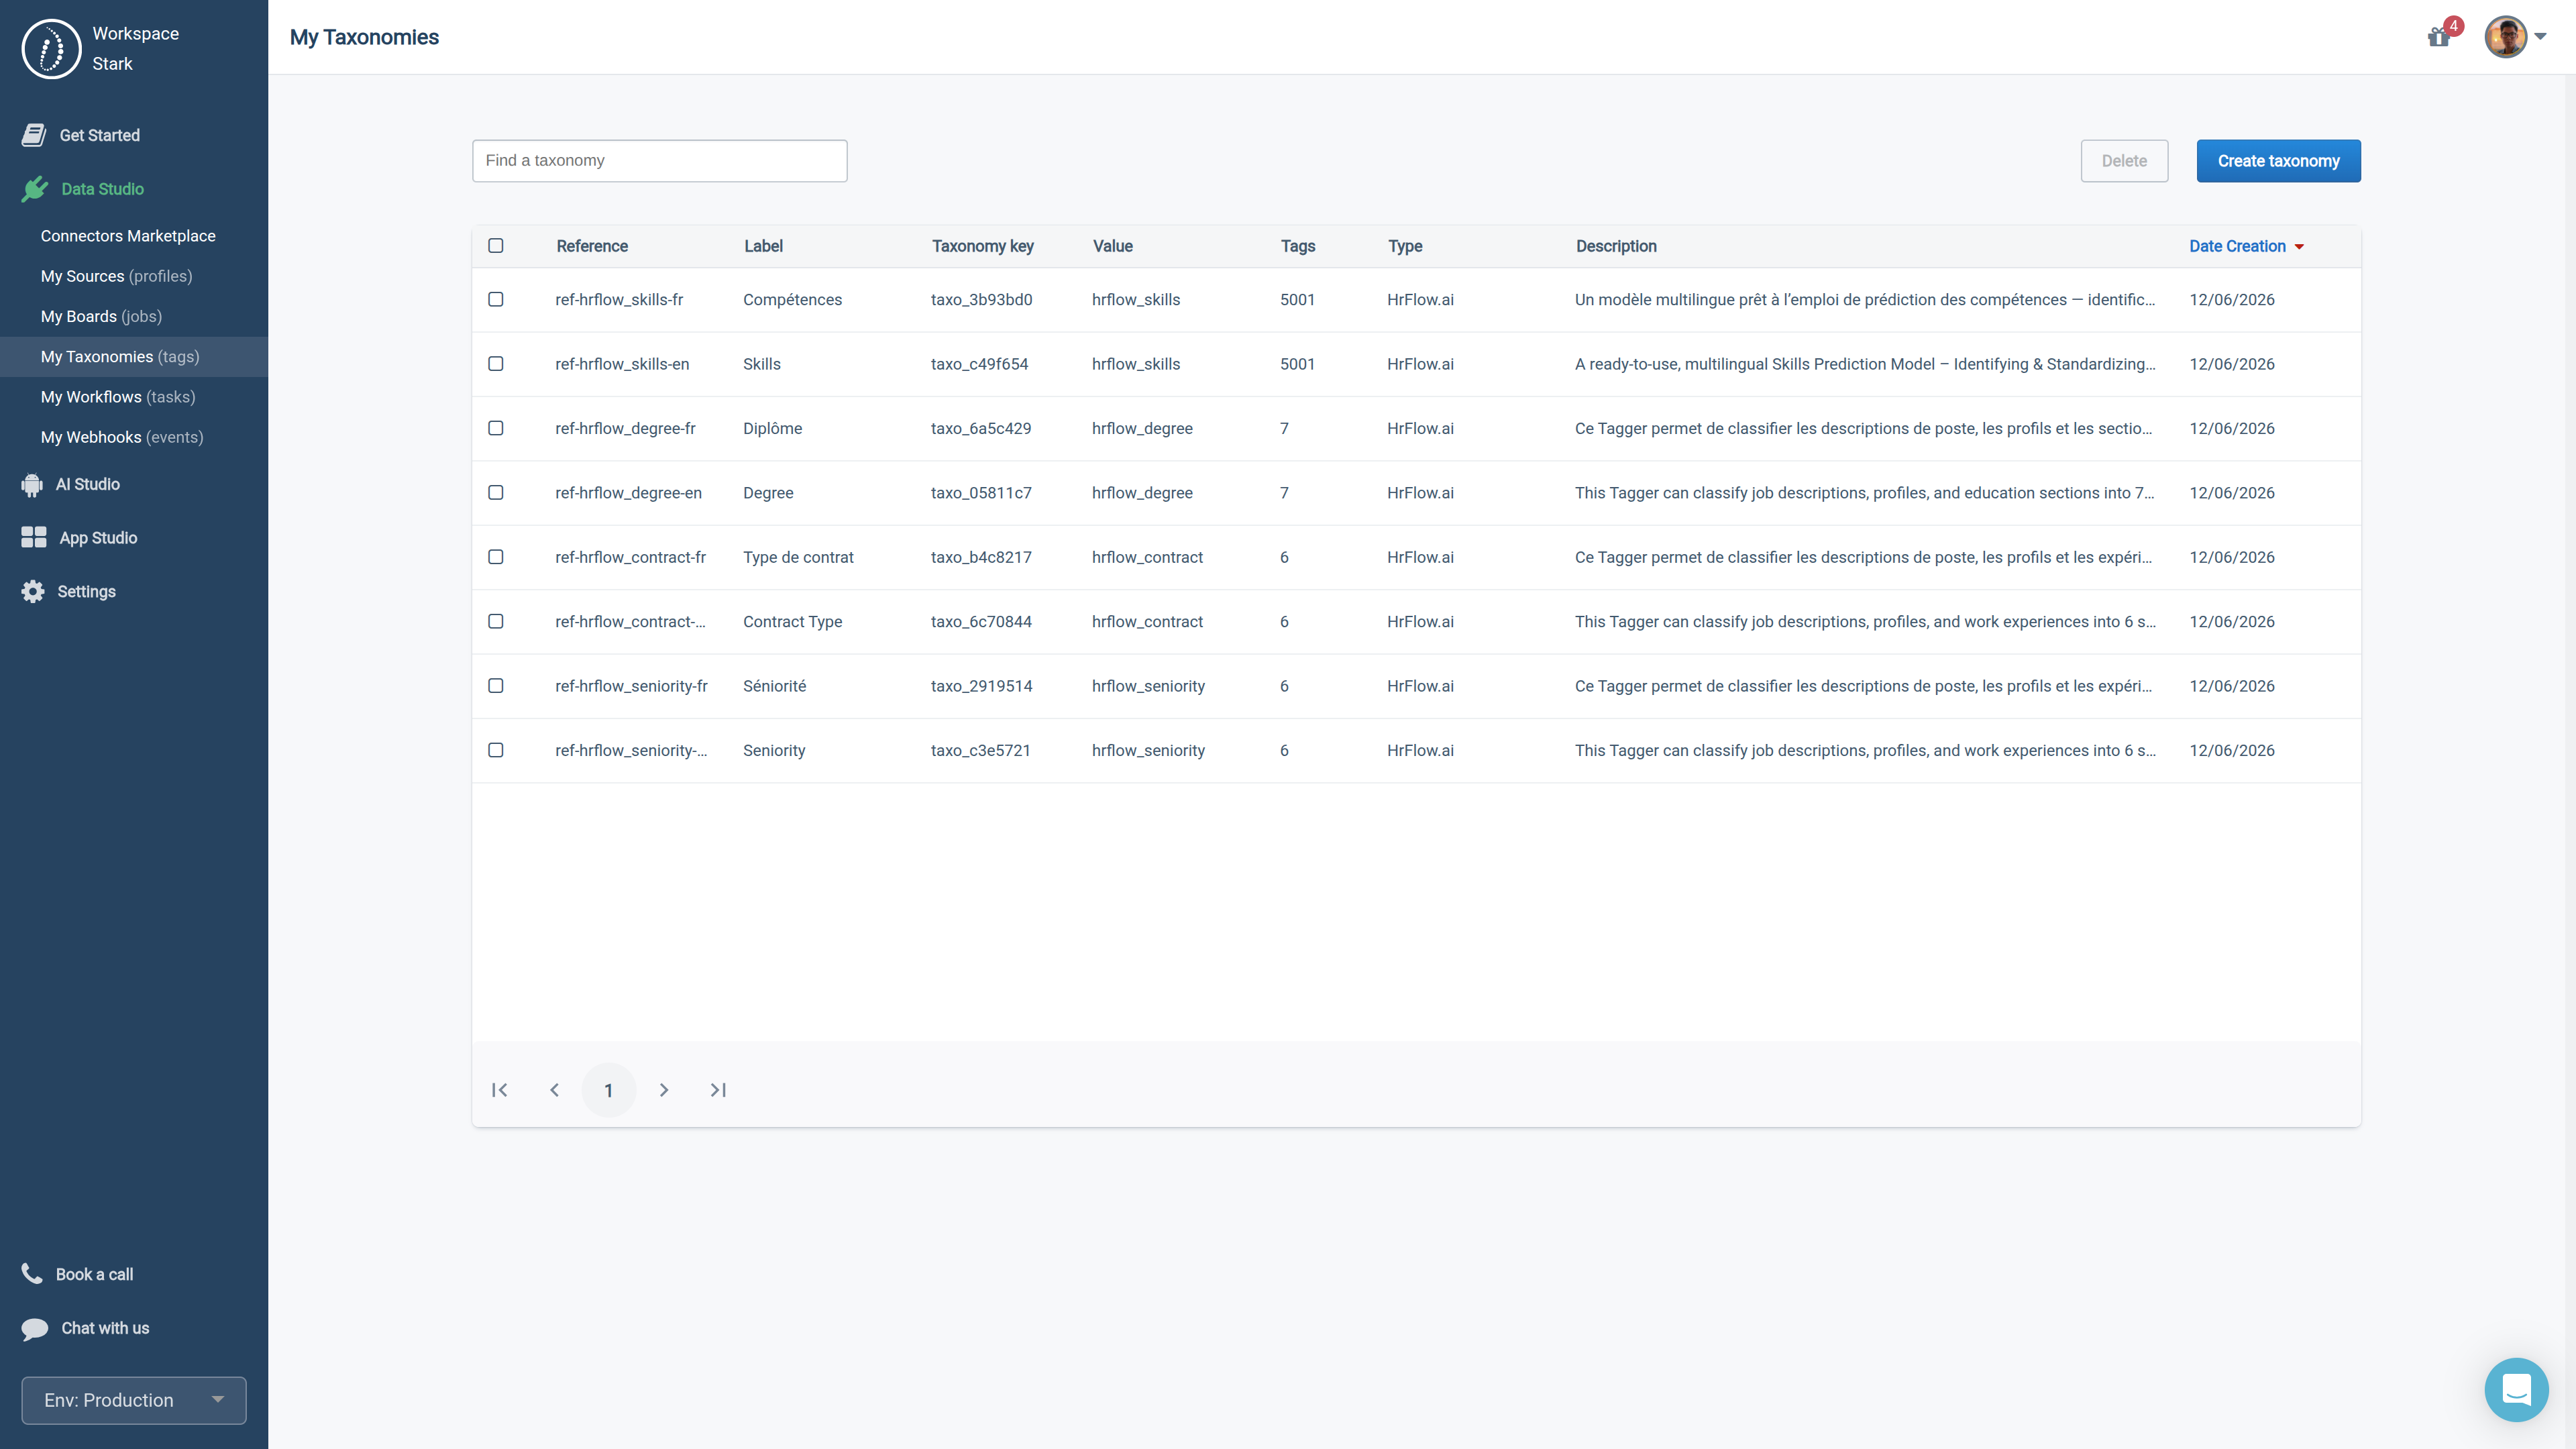
My Taxonomies page
Option A: Create from a Taxonomy in the Marketplace
Some taxonomies are available in the Marketplace, you can create your own taxonomy starting from them. Each of these taxonomies exists in English and in French.
| Taxonomy | Tags | Creation mode | Owner |
|---|---|---|---|
| Seniority | 5 seniority levels | Editable copy | HrFlow.ai |
| Contract Type | 5 contract types | Editable copy | HrFlow.ai |
| Degree | 6 education levels | Editable copy | HrFlow.ai |
| ROME Family | 14 grands domaines of the French ROME 4.0 | Editable copy | France Travail |
| ROME Sub-family | 110 domaines of the ROME 4.0 | Editable copy | France Travail |
| ROME Category | 1056 métiers of the ROME 4.0 | Read-only | France Travail |
| ROME Job Title | 12107 appellations of the ROME 4.0 (OGR codes) | Read-only | France Travail |
| Skills | 5000 hard and soft skills | Read-only | HrFlow.ai |
From My Taxonomies, browse the Marketplace taxonomies, pick one and create from it. Give your copy a name, then, if it is an editable copy, adjust its tags.
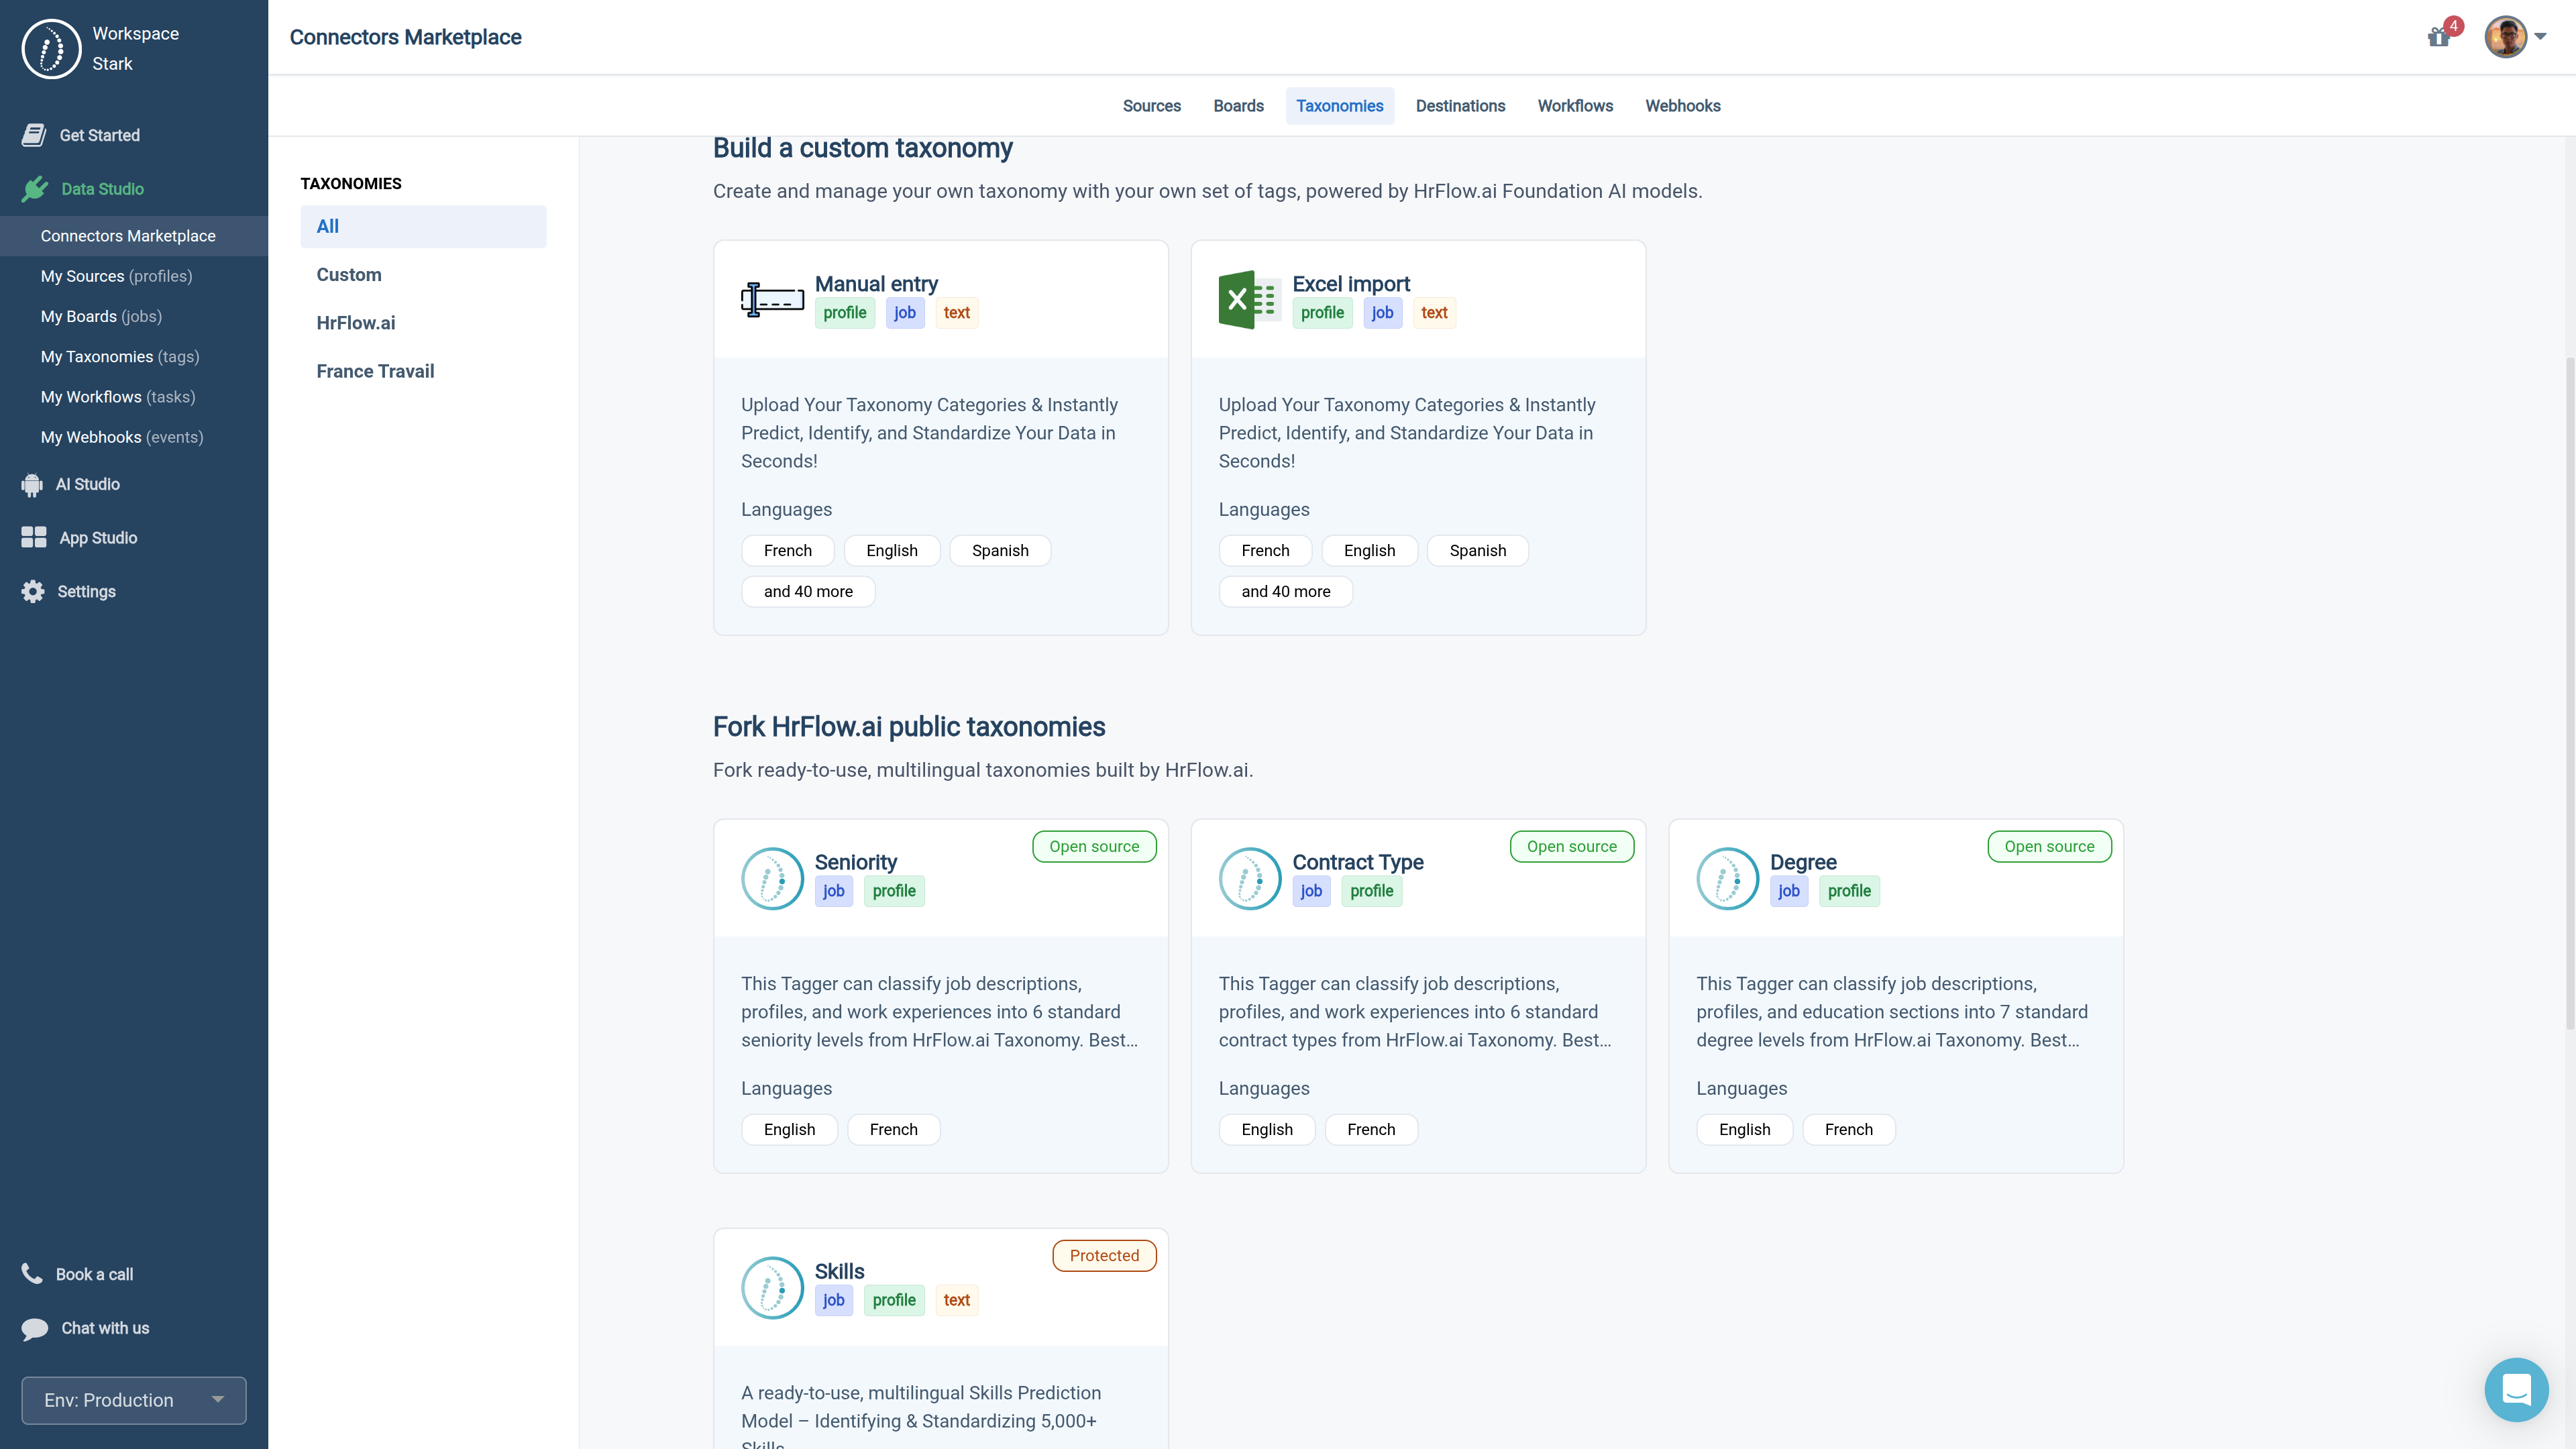
Marketplace taxonomies
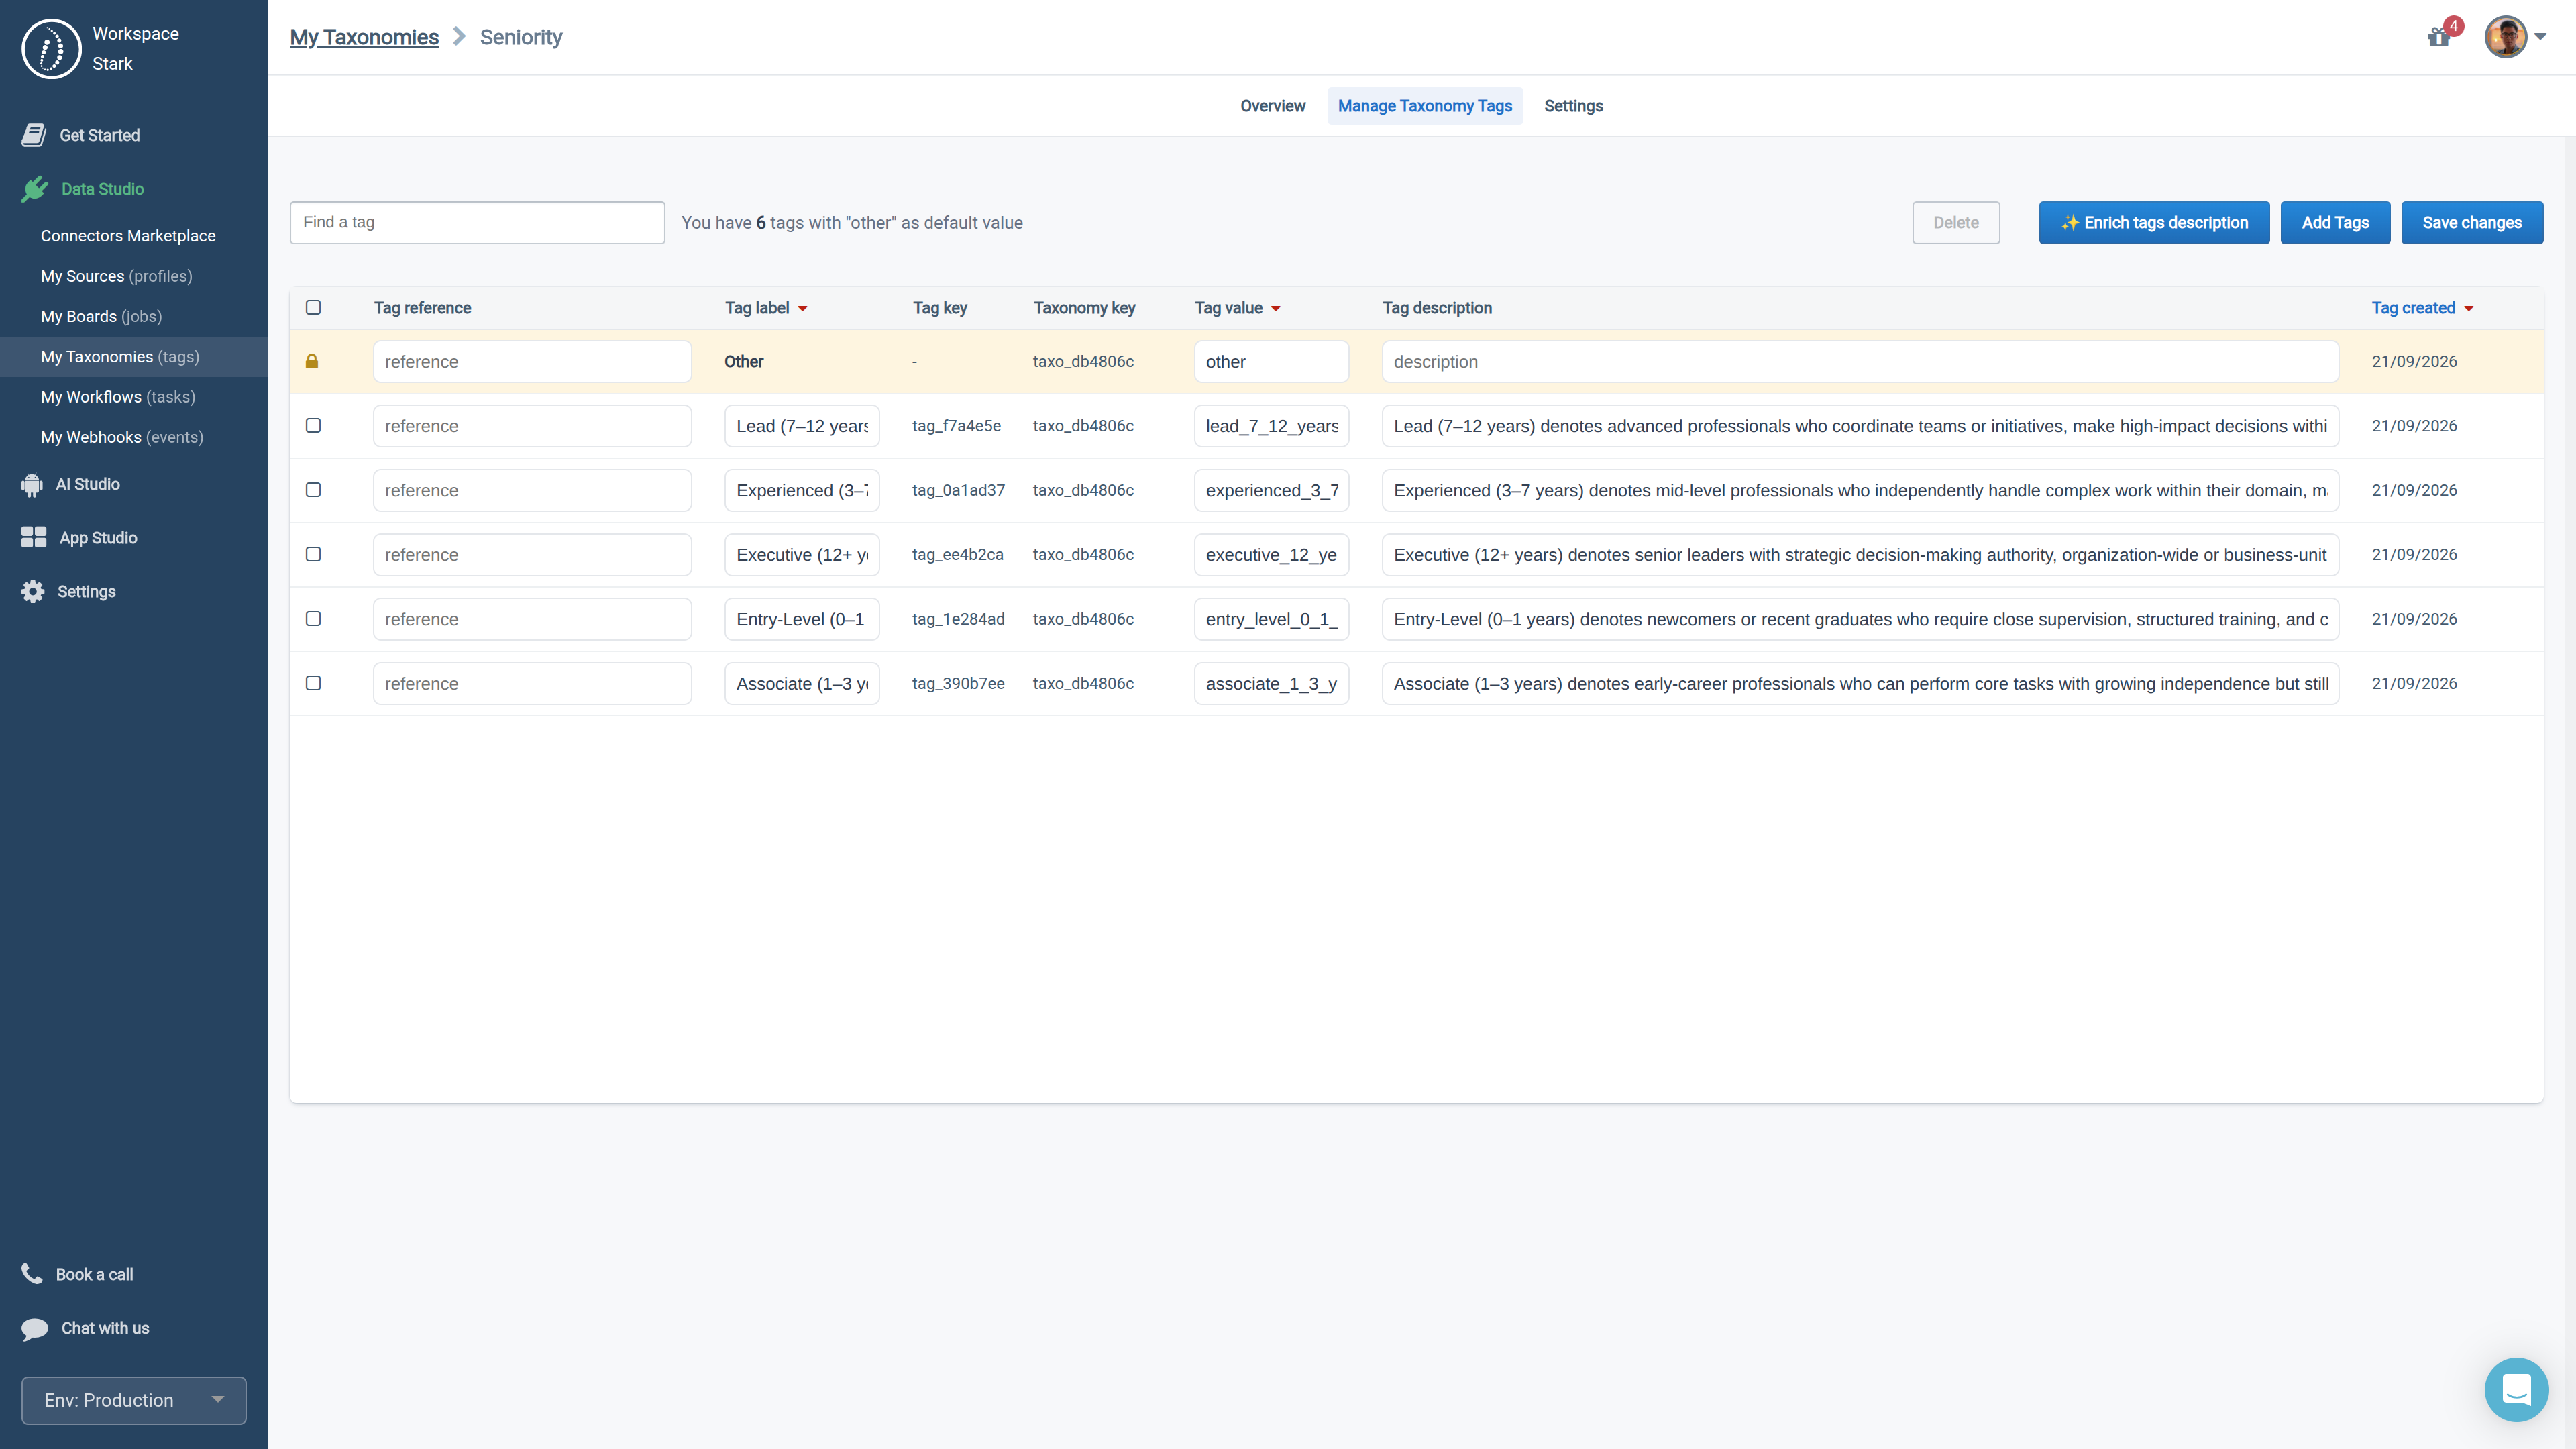
Seniority taxonomy copied from the Marketplace with its editable tags
Option B: Create your own taxonomy
From My Taxonomies, create a new taxonomy: give it a name and a technical value, choose what it applies to (jobs, profiles, texts), then add its tags one by one or in bulk. Each tag has a value (the stable identifier you will get back in the API), a label and a description.
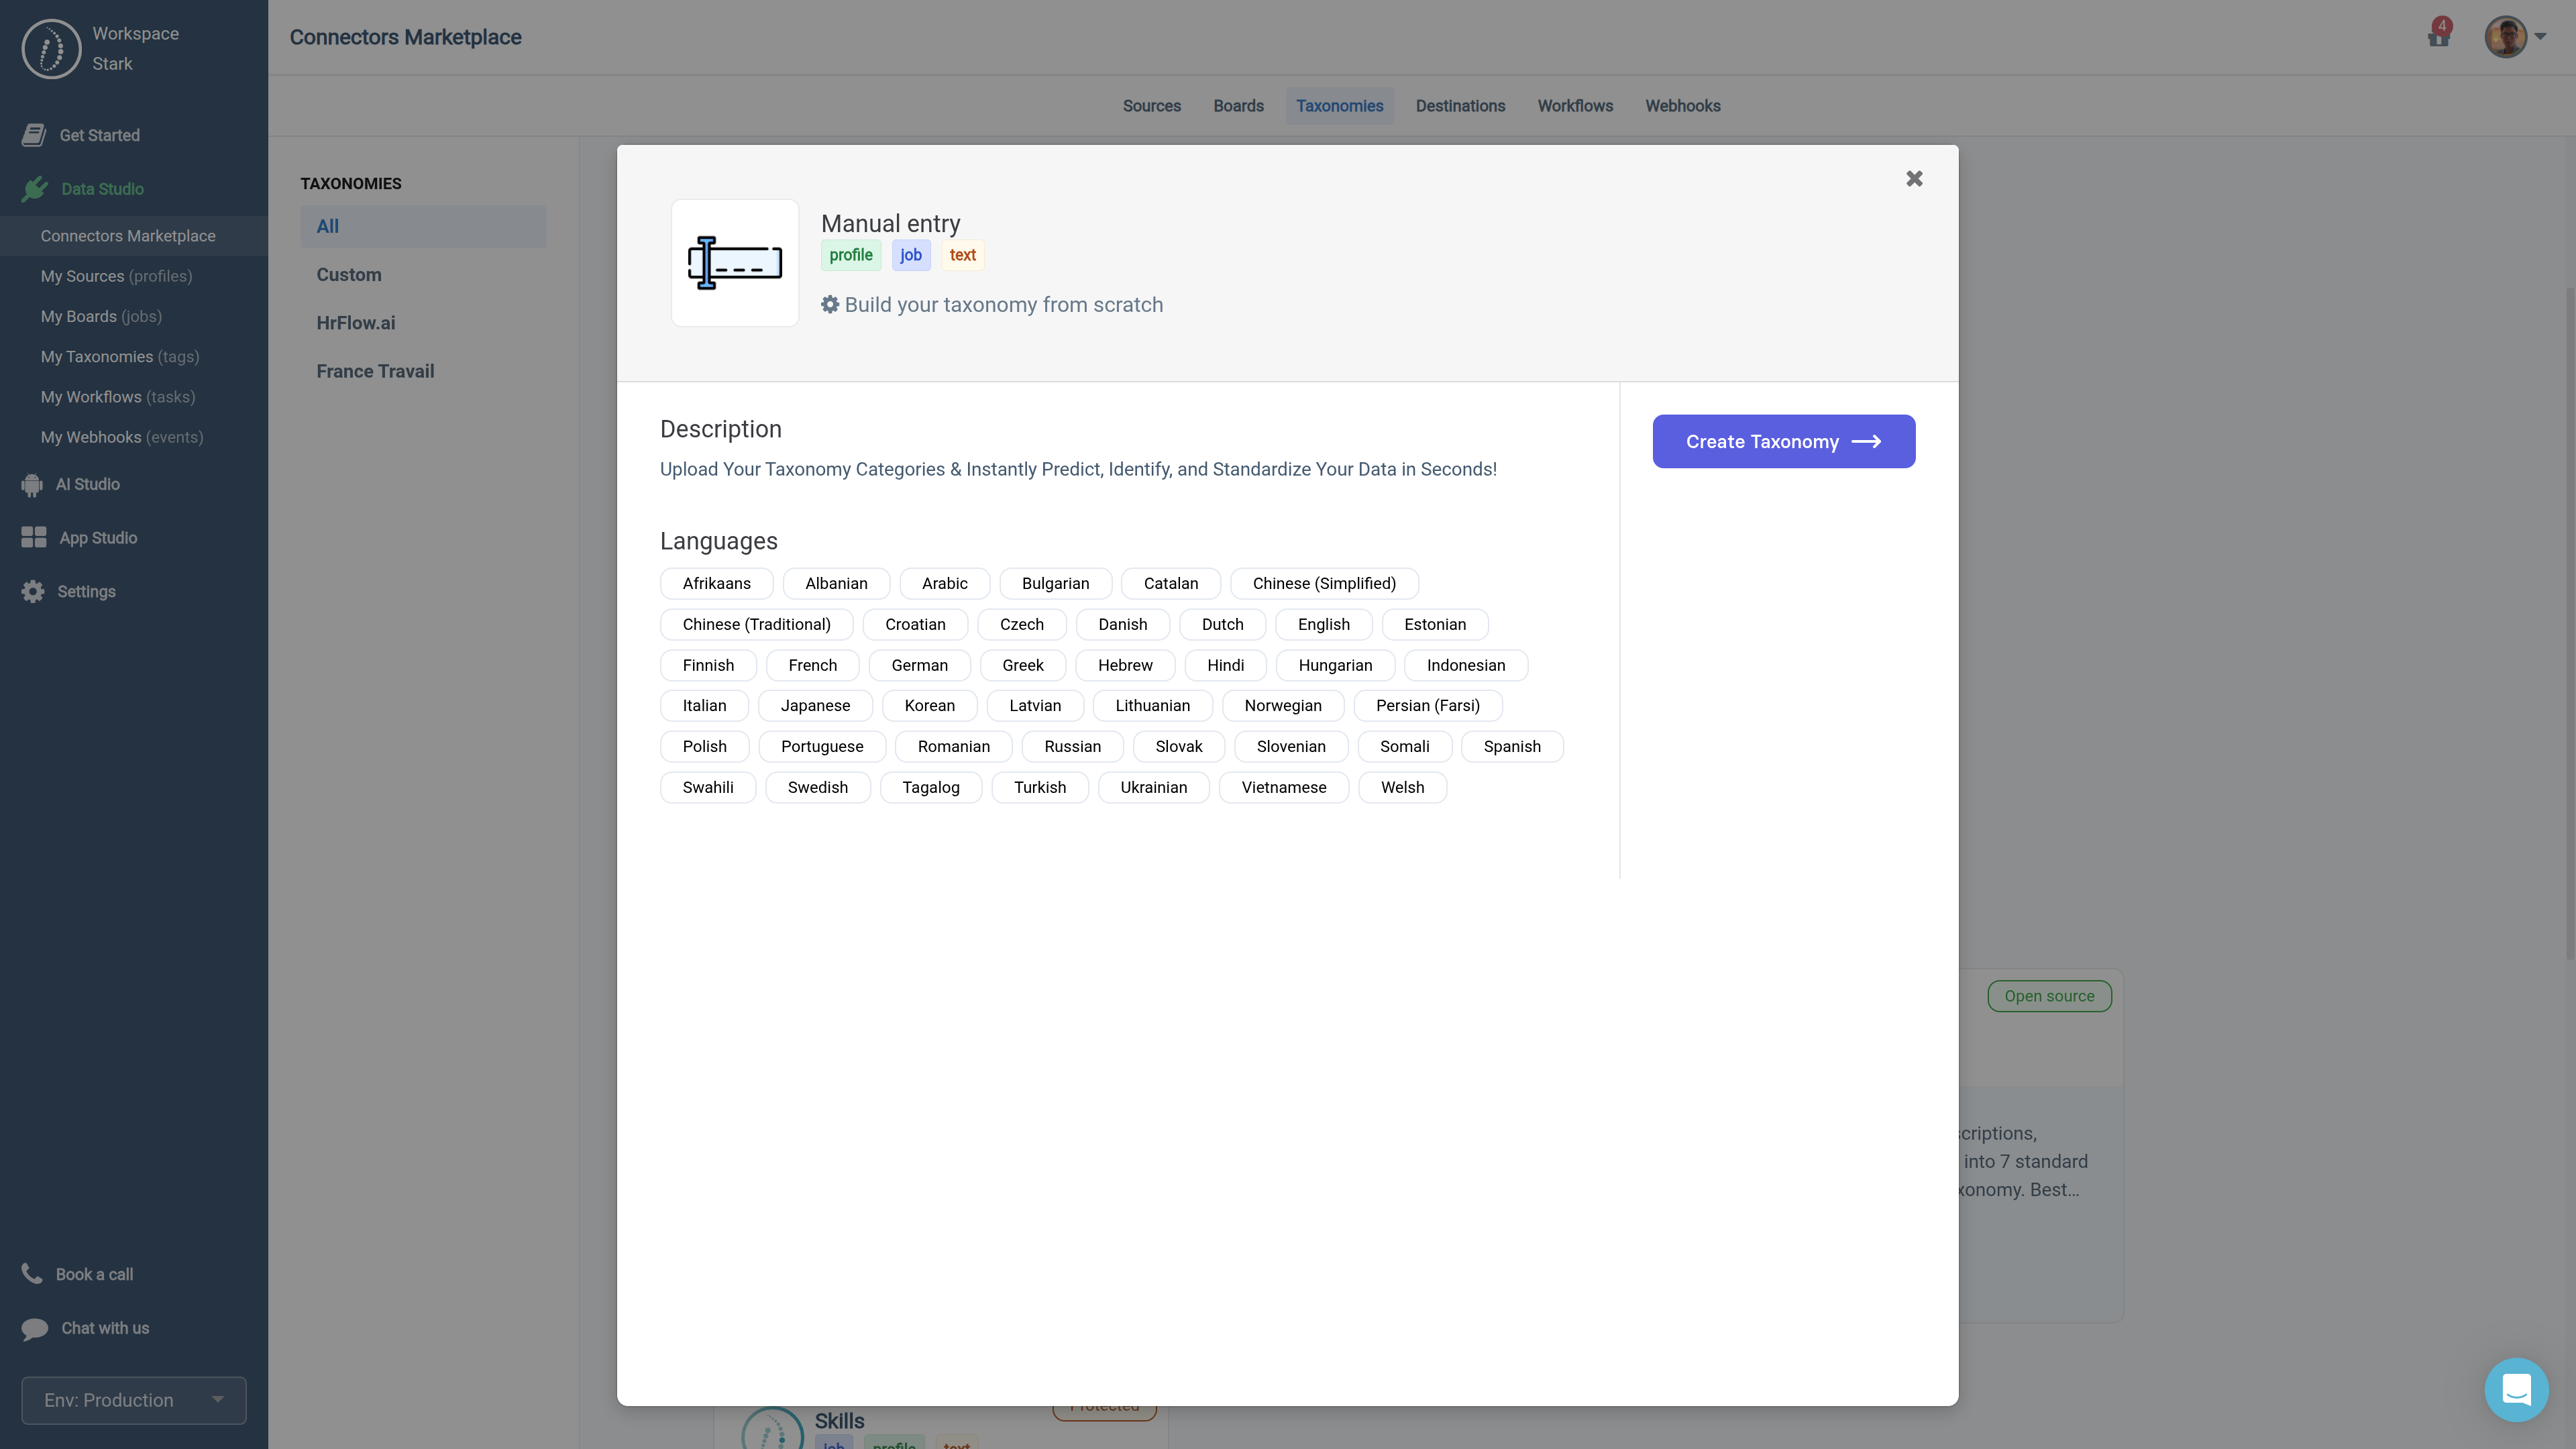
Create an empty taxonomy
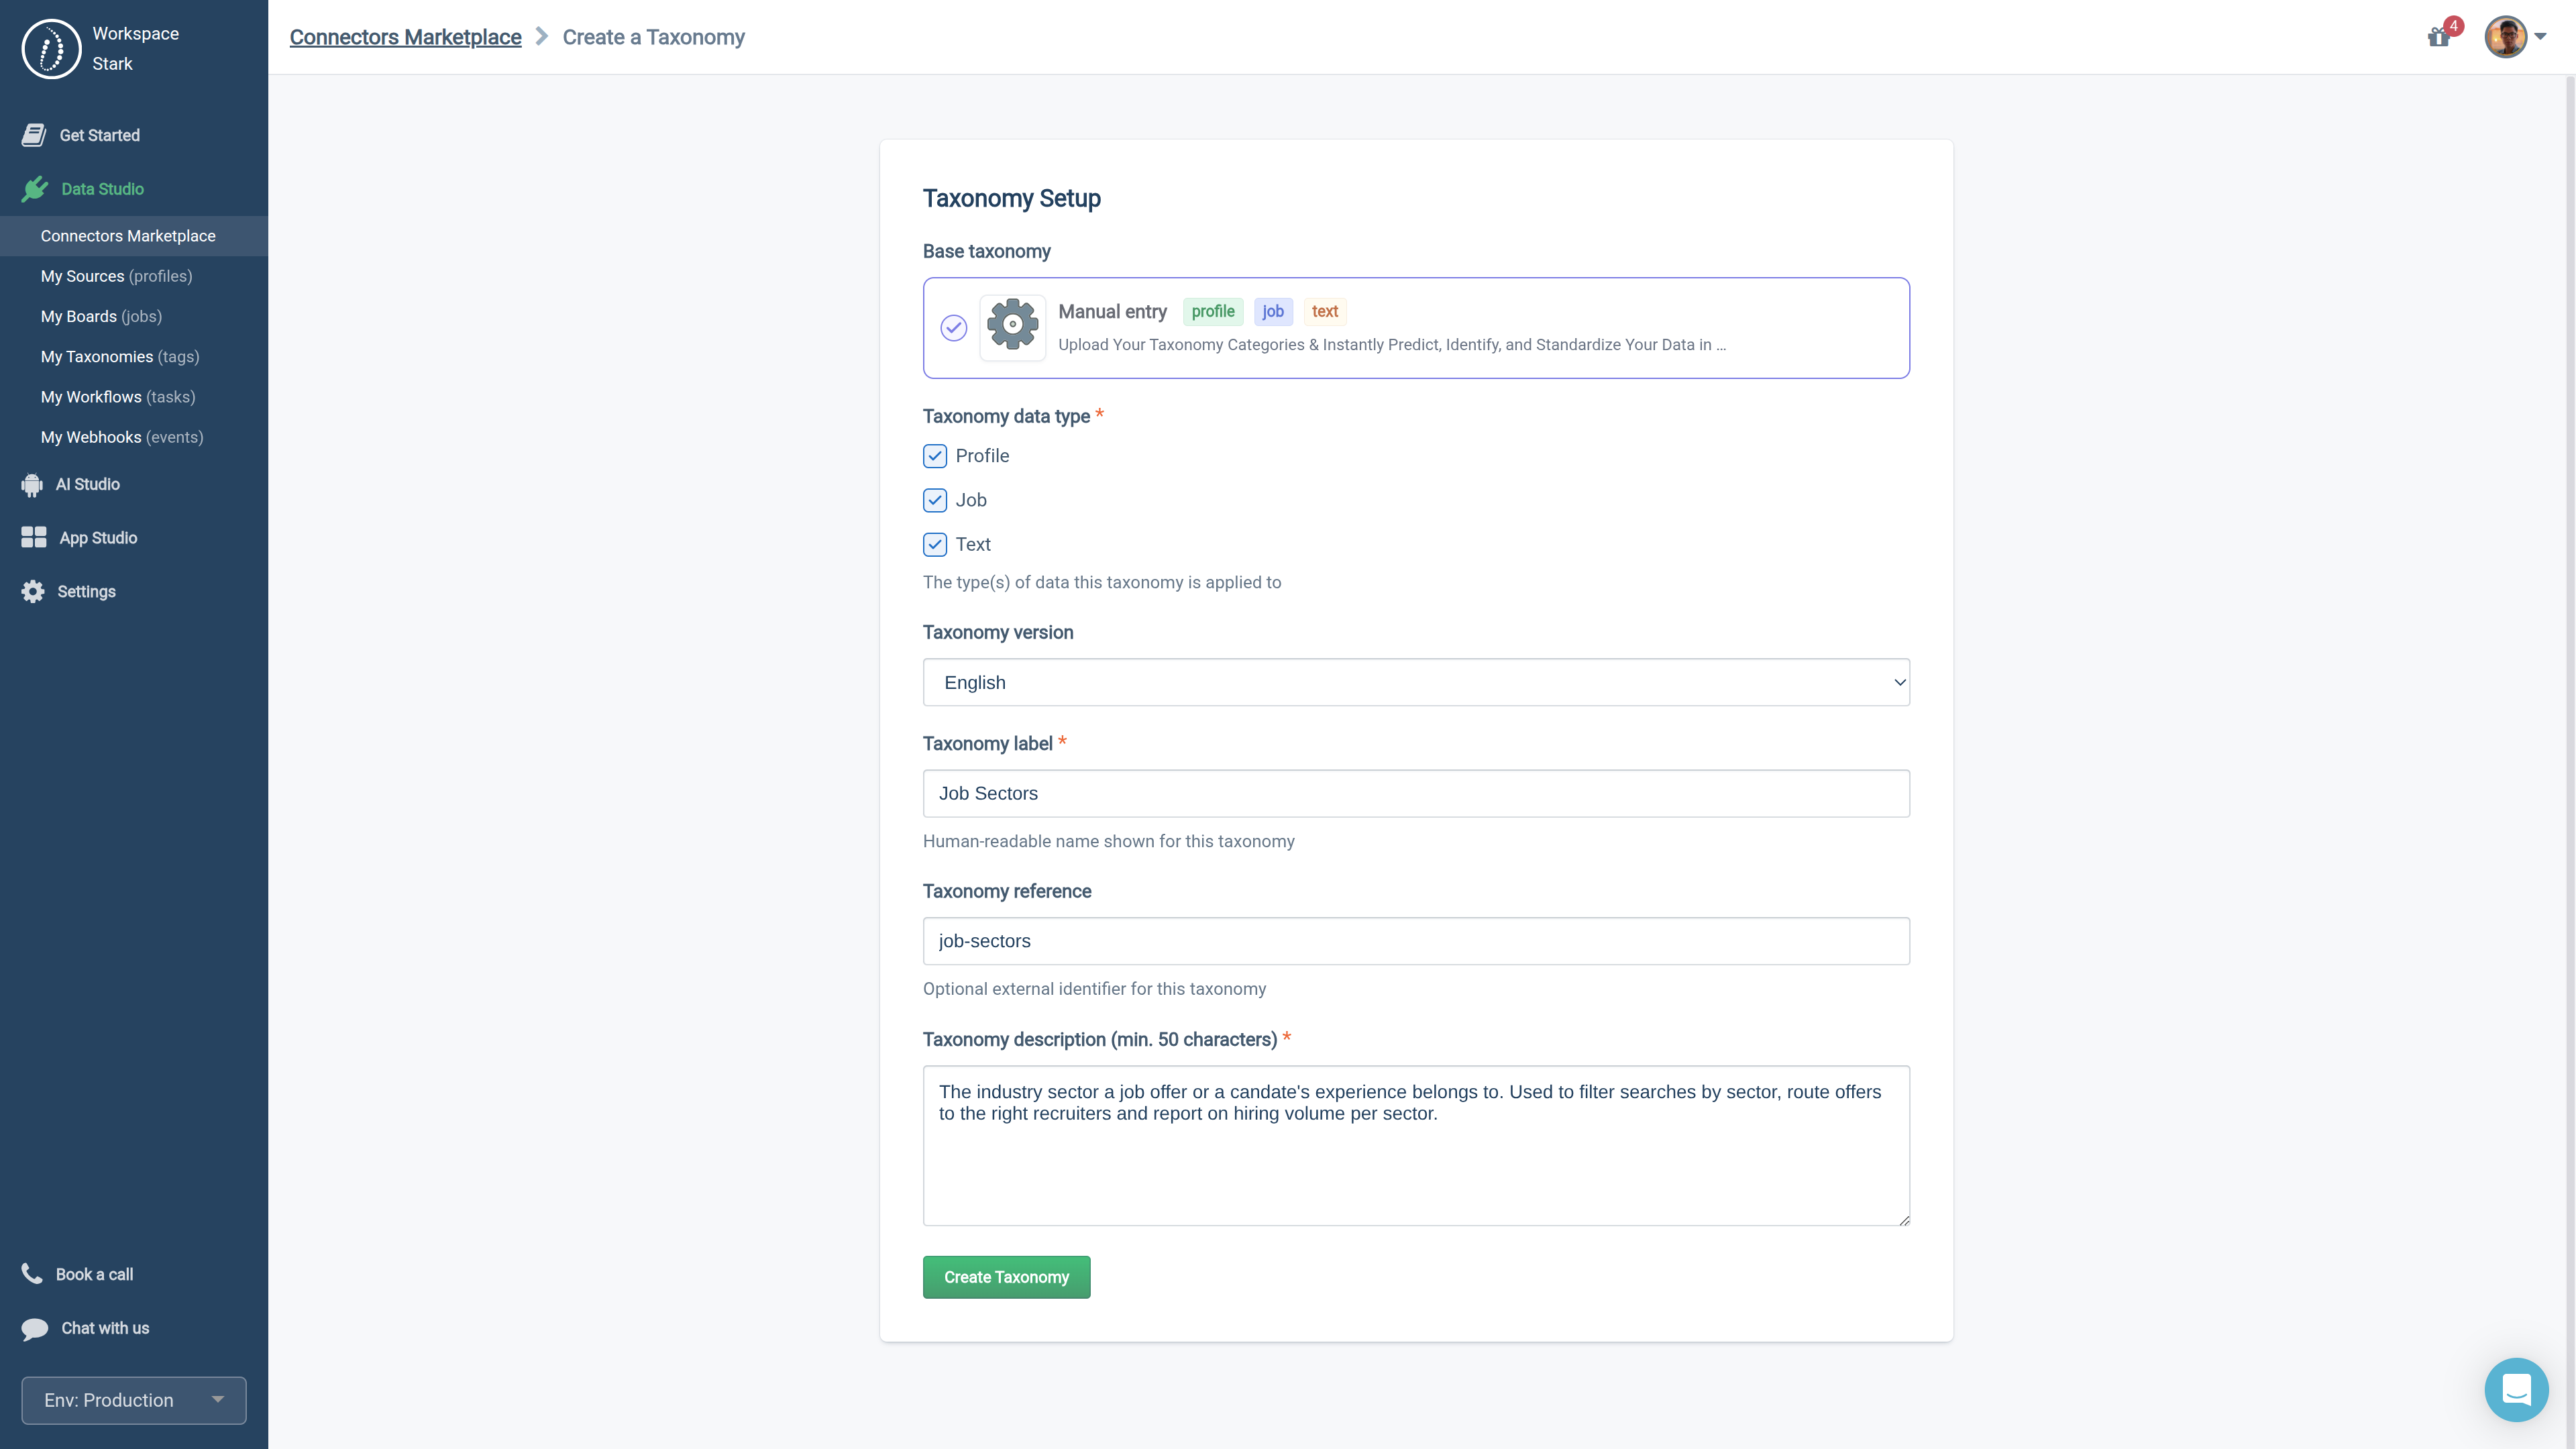
Taxonomy Creation Form
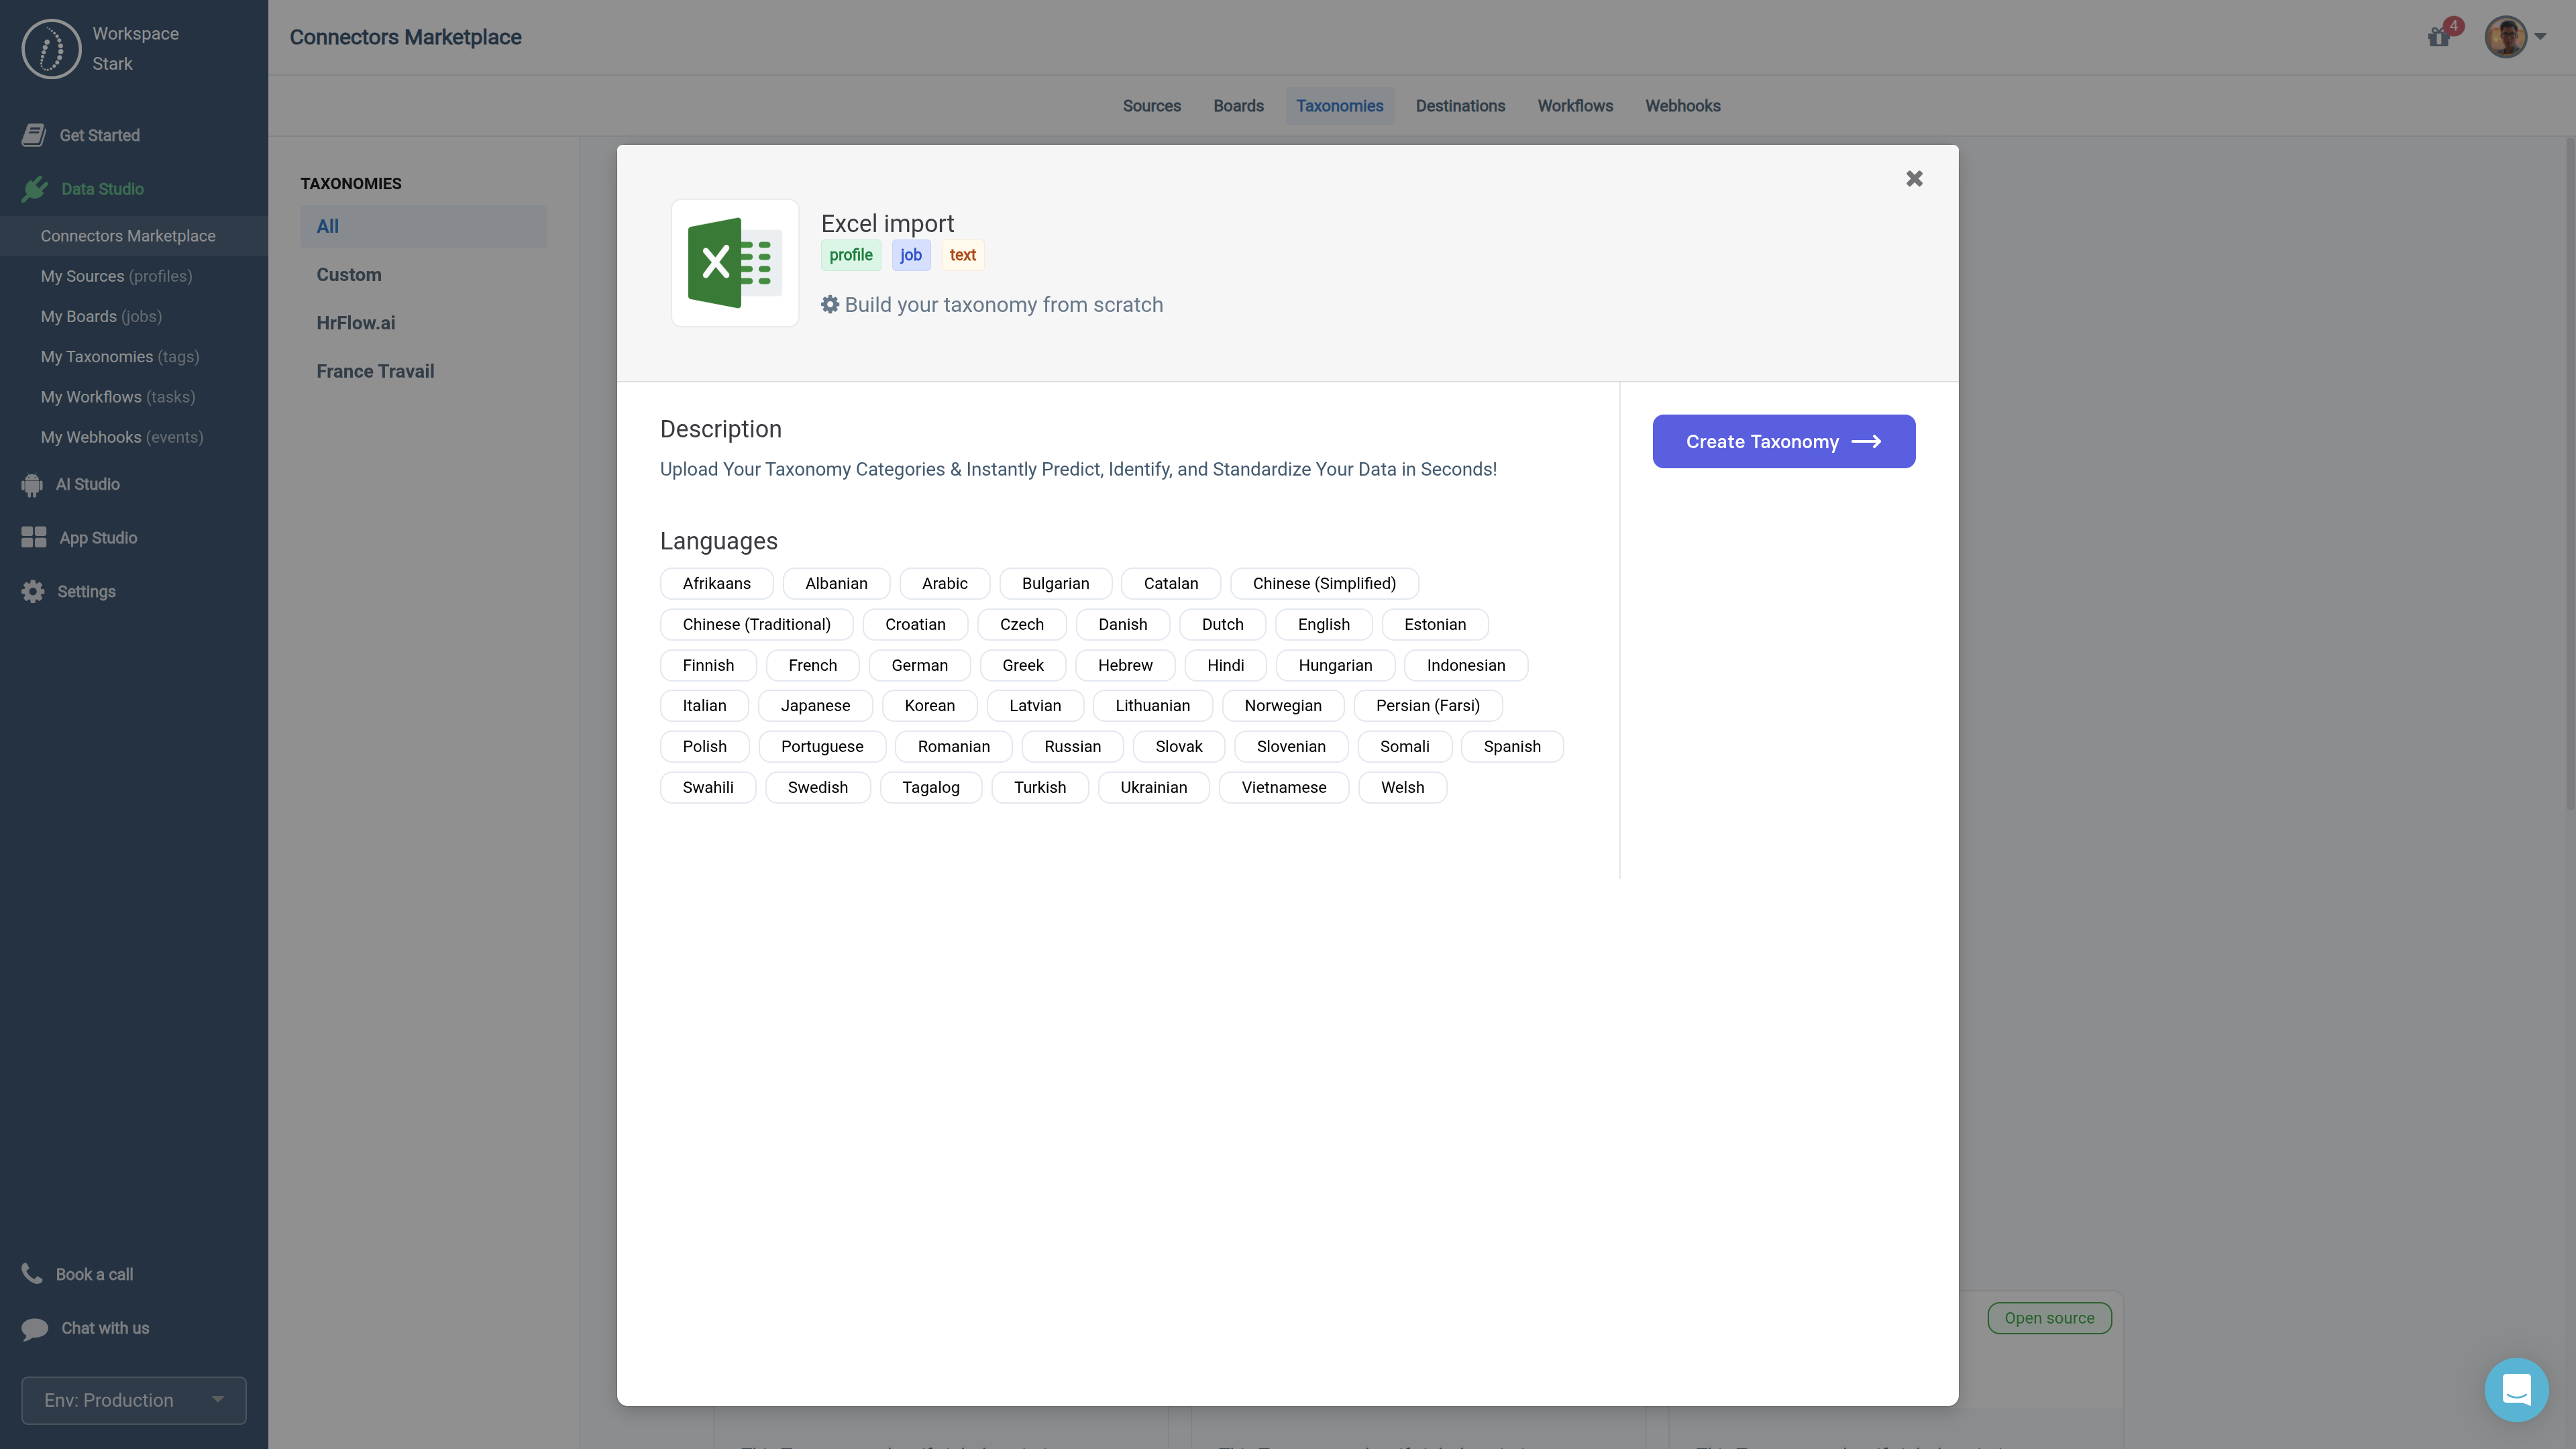
Import a taxonomy from an excel file
Write tags the tagger can understandThe tagger relies on each tag's label and description to recognise it in a text. Give every tag a clear, unambiguous label and a one- or two-sentence description written the way it would appear in a job description or a resume. Two tags with the same label and description cannot be told apart.
A default tag named Other is managed automatically in every taxonomy. You do not need to create it.
Step 2: Create a Tagging Algorithm
Go to Left Sidebar > AI Studio > My Tagging Algorithms and create a new algorithm. Pick a model:
| Model | Best for |
|---|---|
| Programmatic Small | High-volume, real-time tagging. Our fastest model. |
| Programmatic Medium | Everyday tagging workloads, balancing accuracy and speed. |
| Programmatic Large | Complex or fine-grained taxonomies. Our most accurate model. |
Give the algorithm a name and a description, and select the taxonomy it will classify into. A taxonomy can be attached to only one Tagging Algorithm.
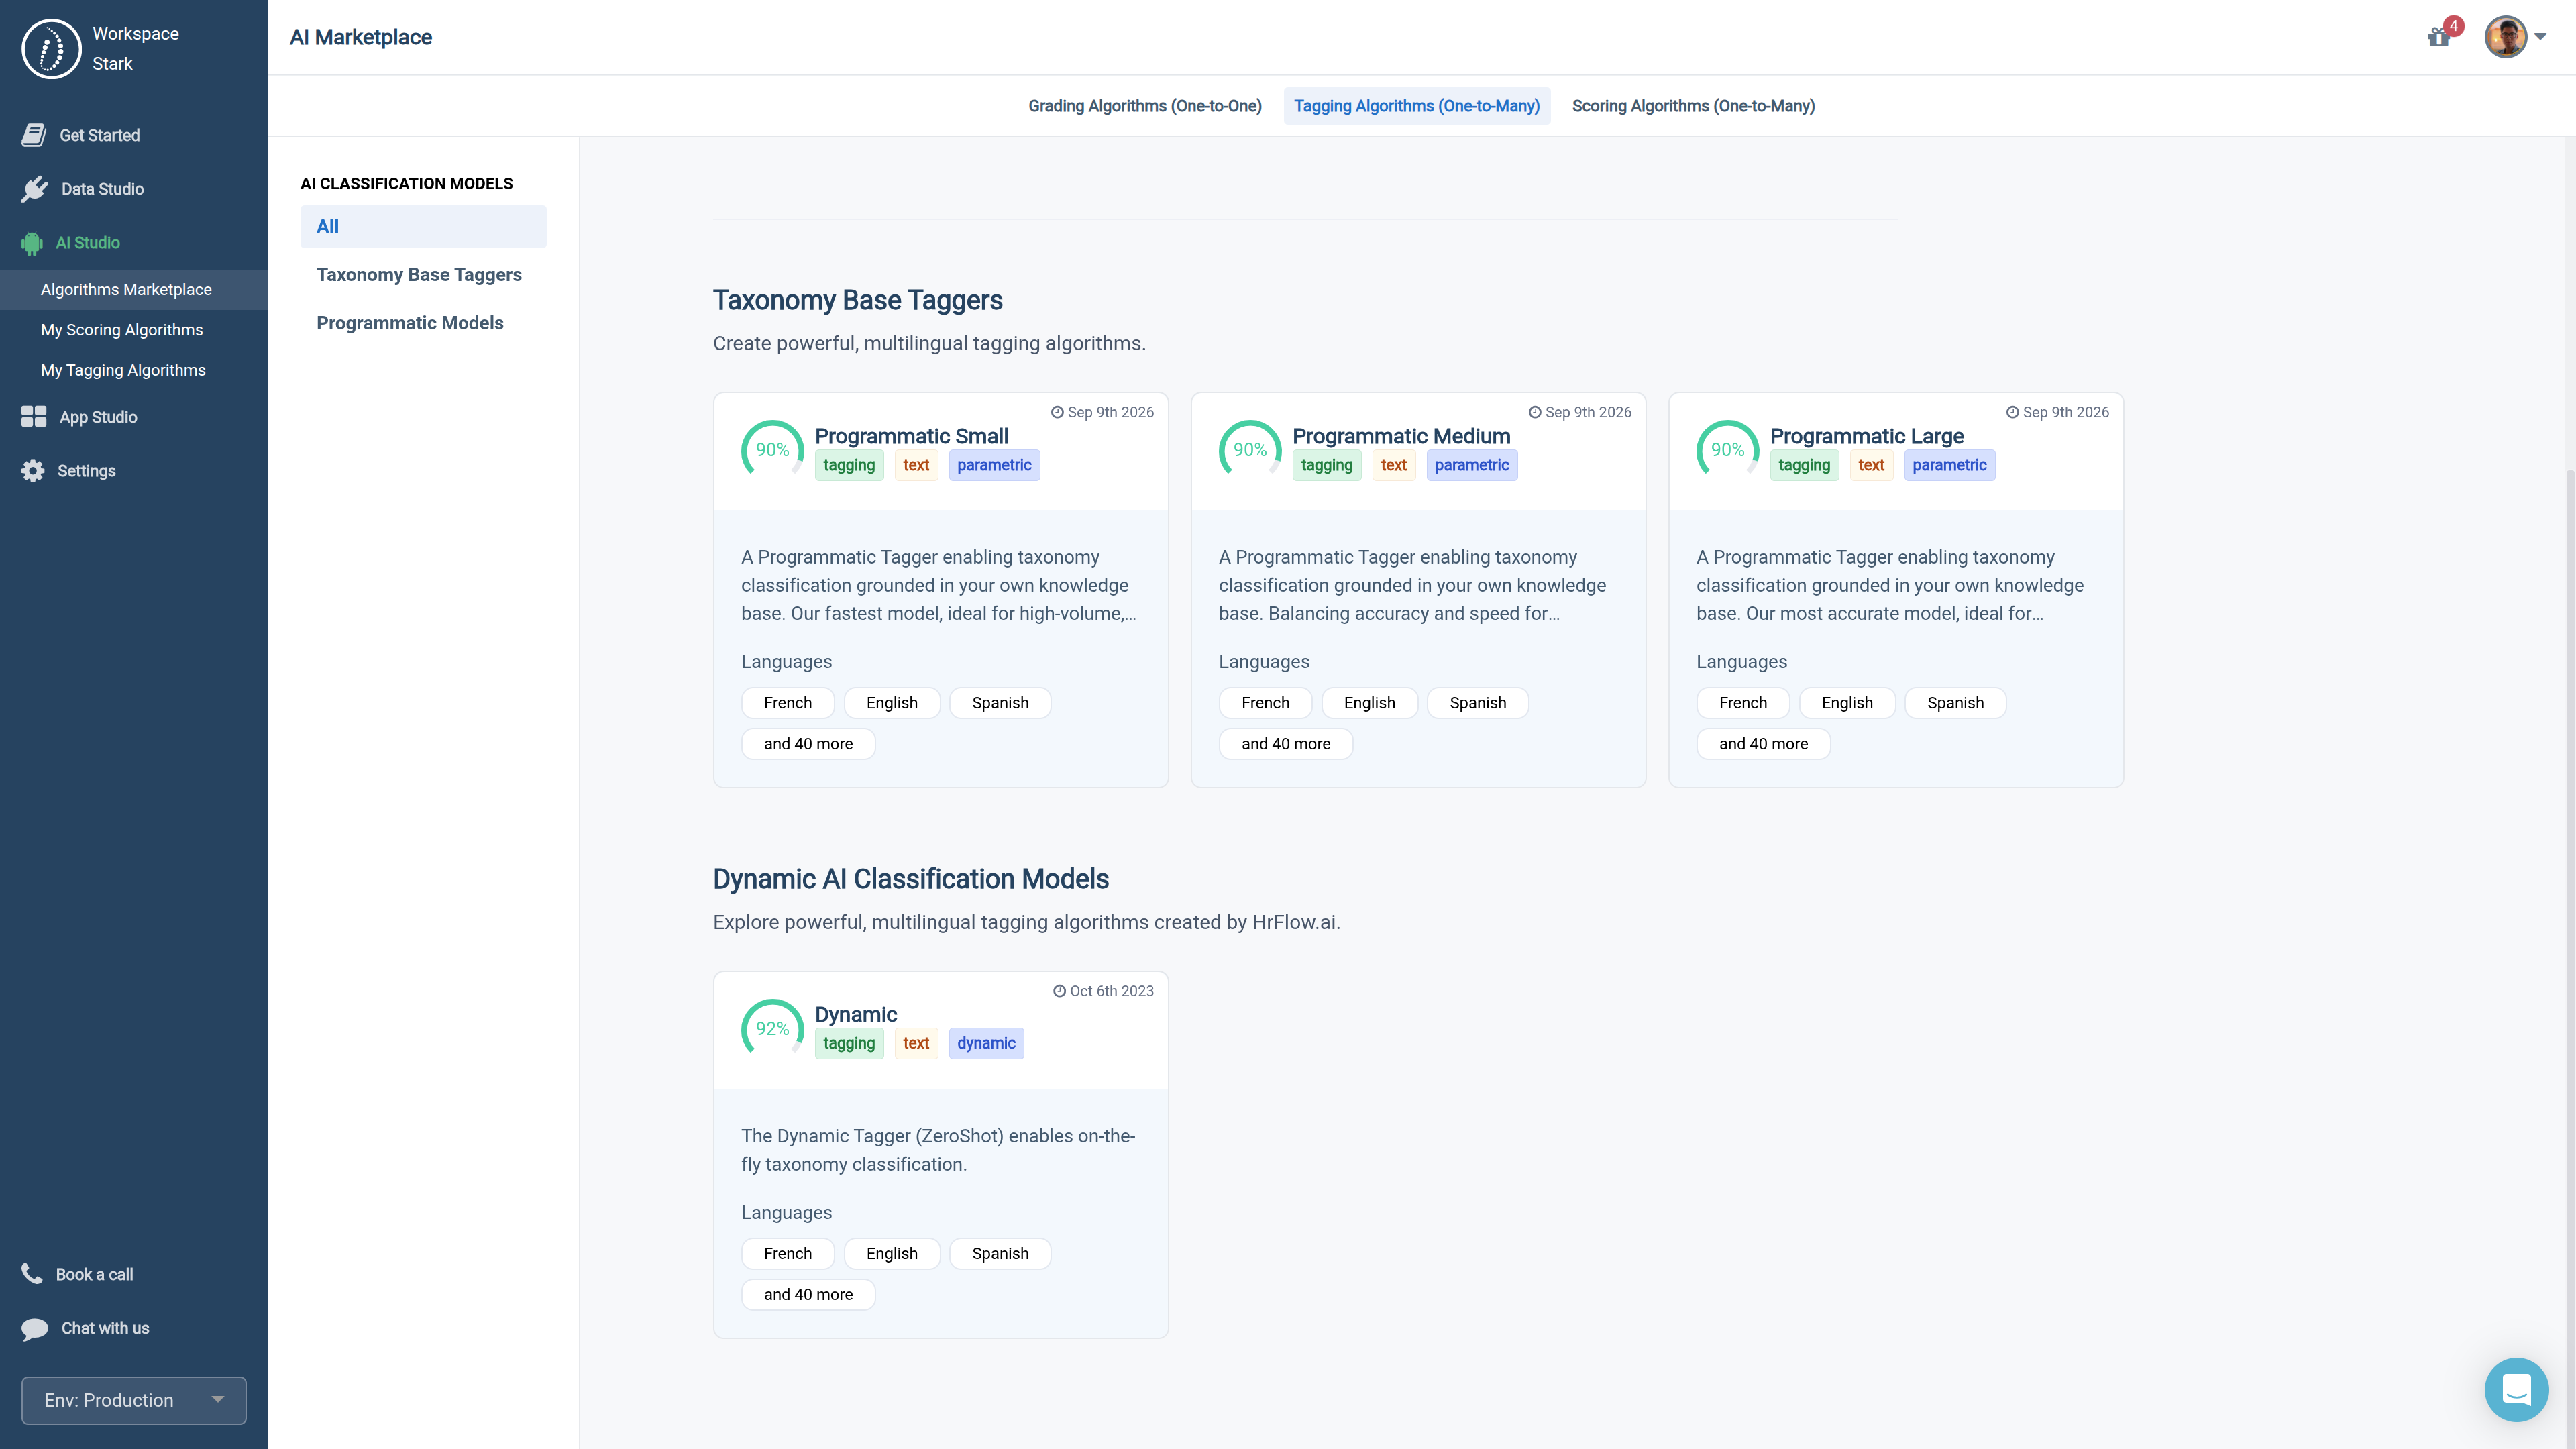
Taggers Marketplace
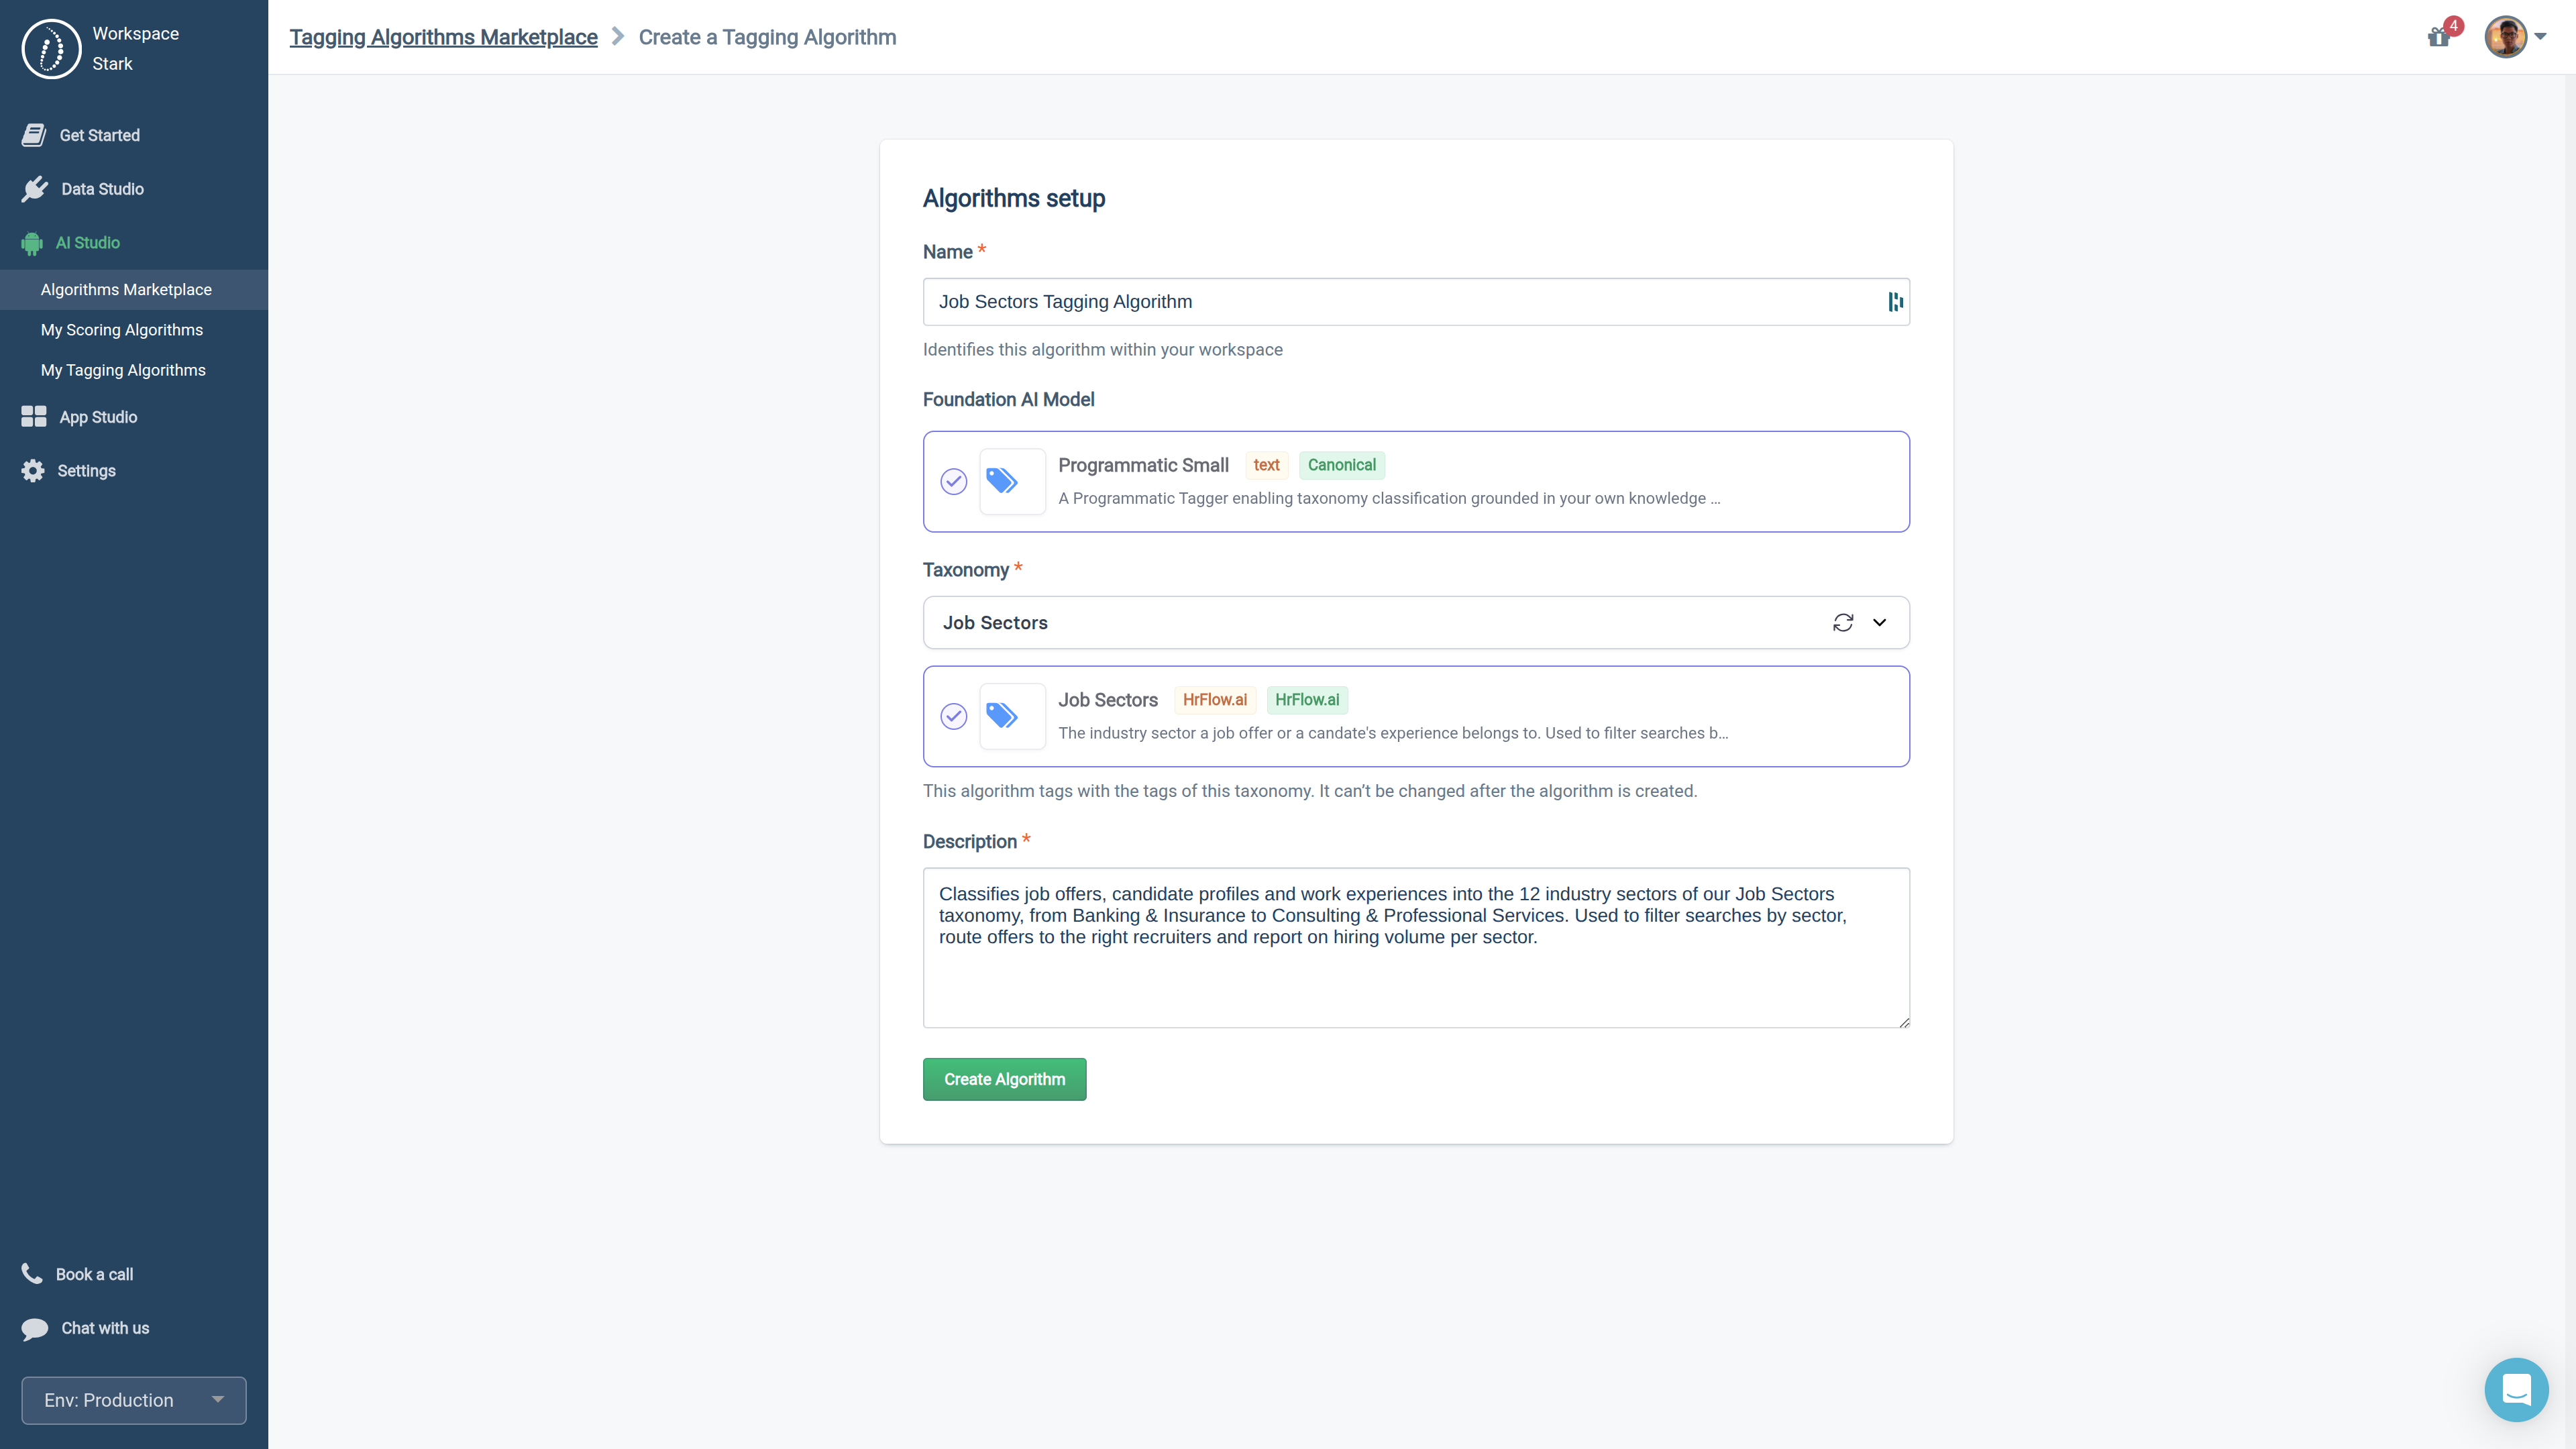
Tagging algorithm creation form
The new algorithm appears in My Tagging Algorithms. Its Overview section shows the algorithm_key you will use in your API requests.
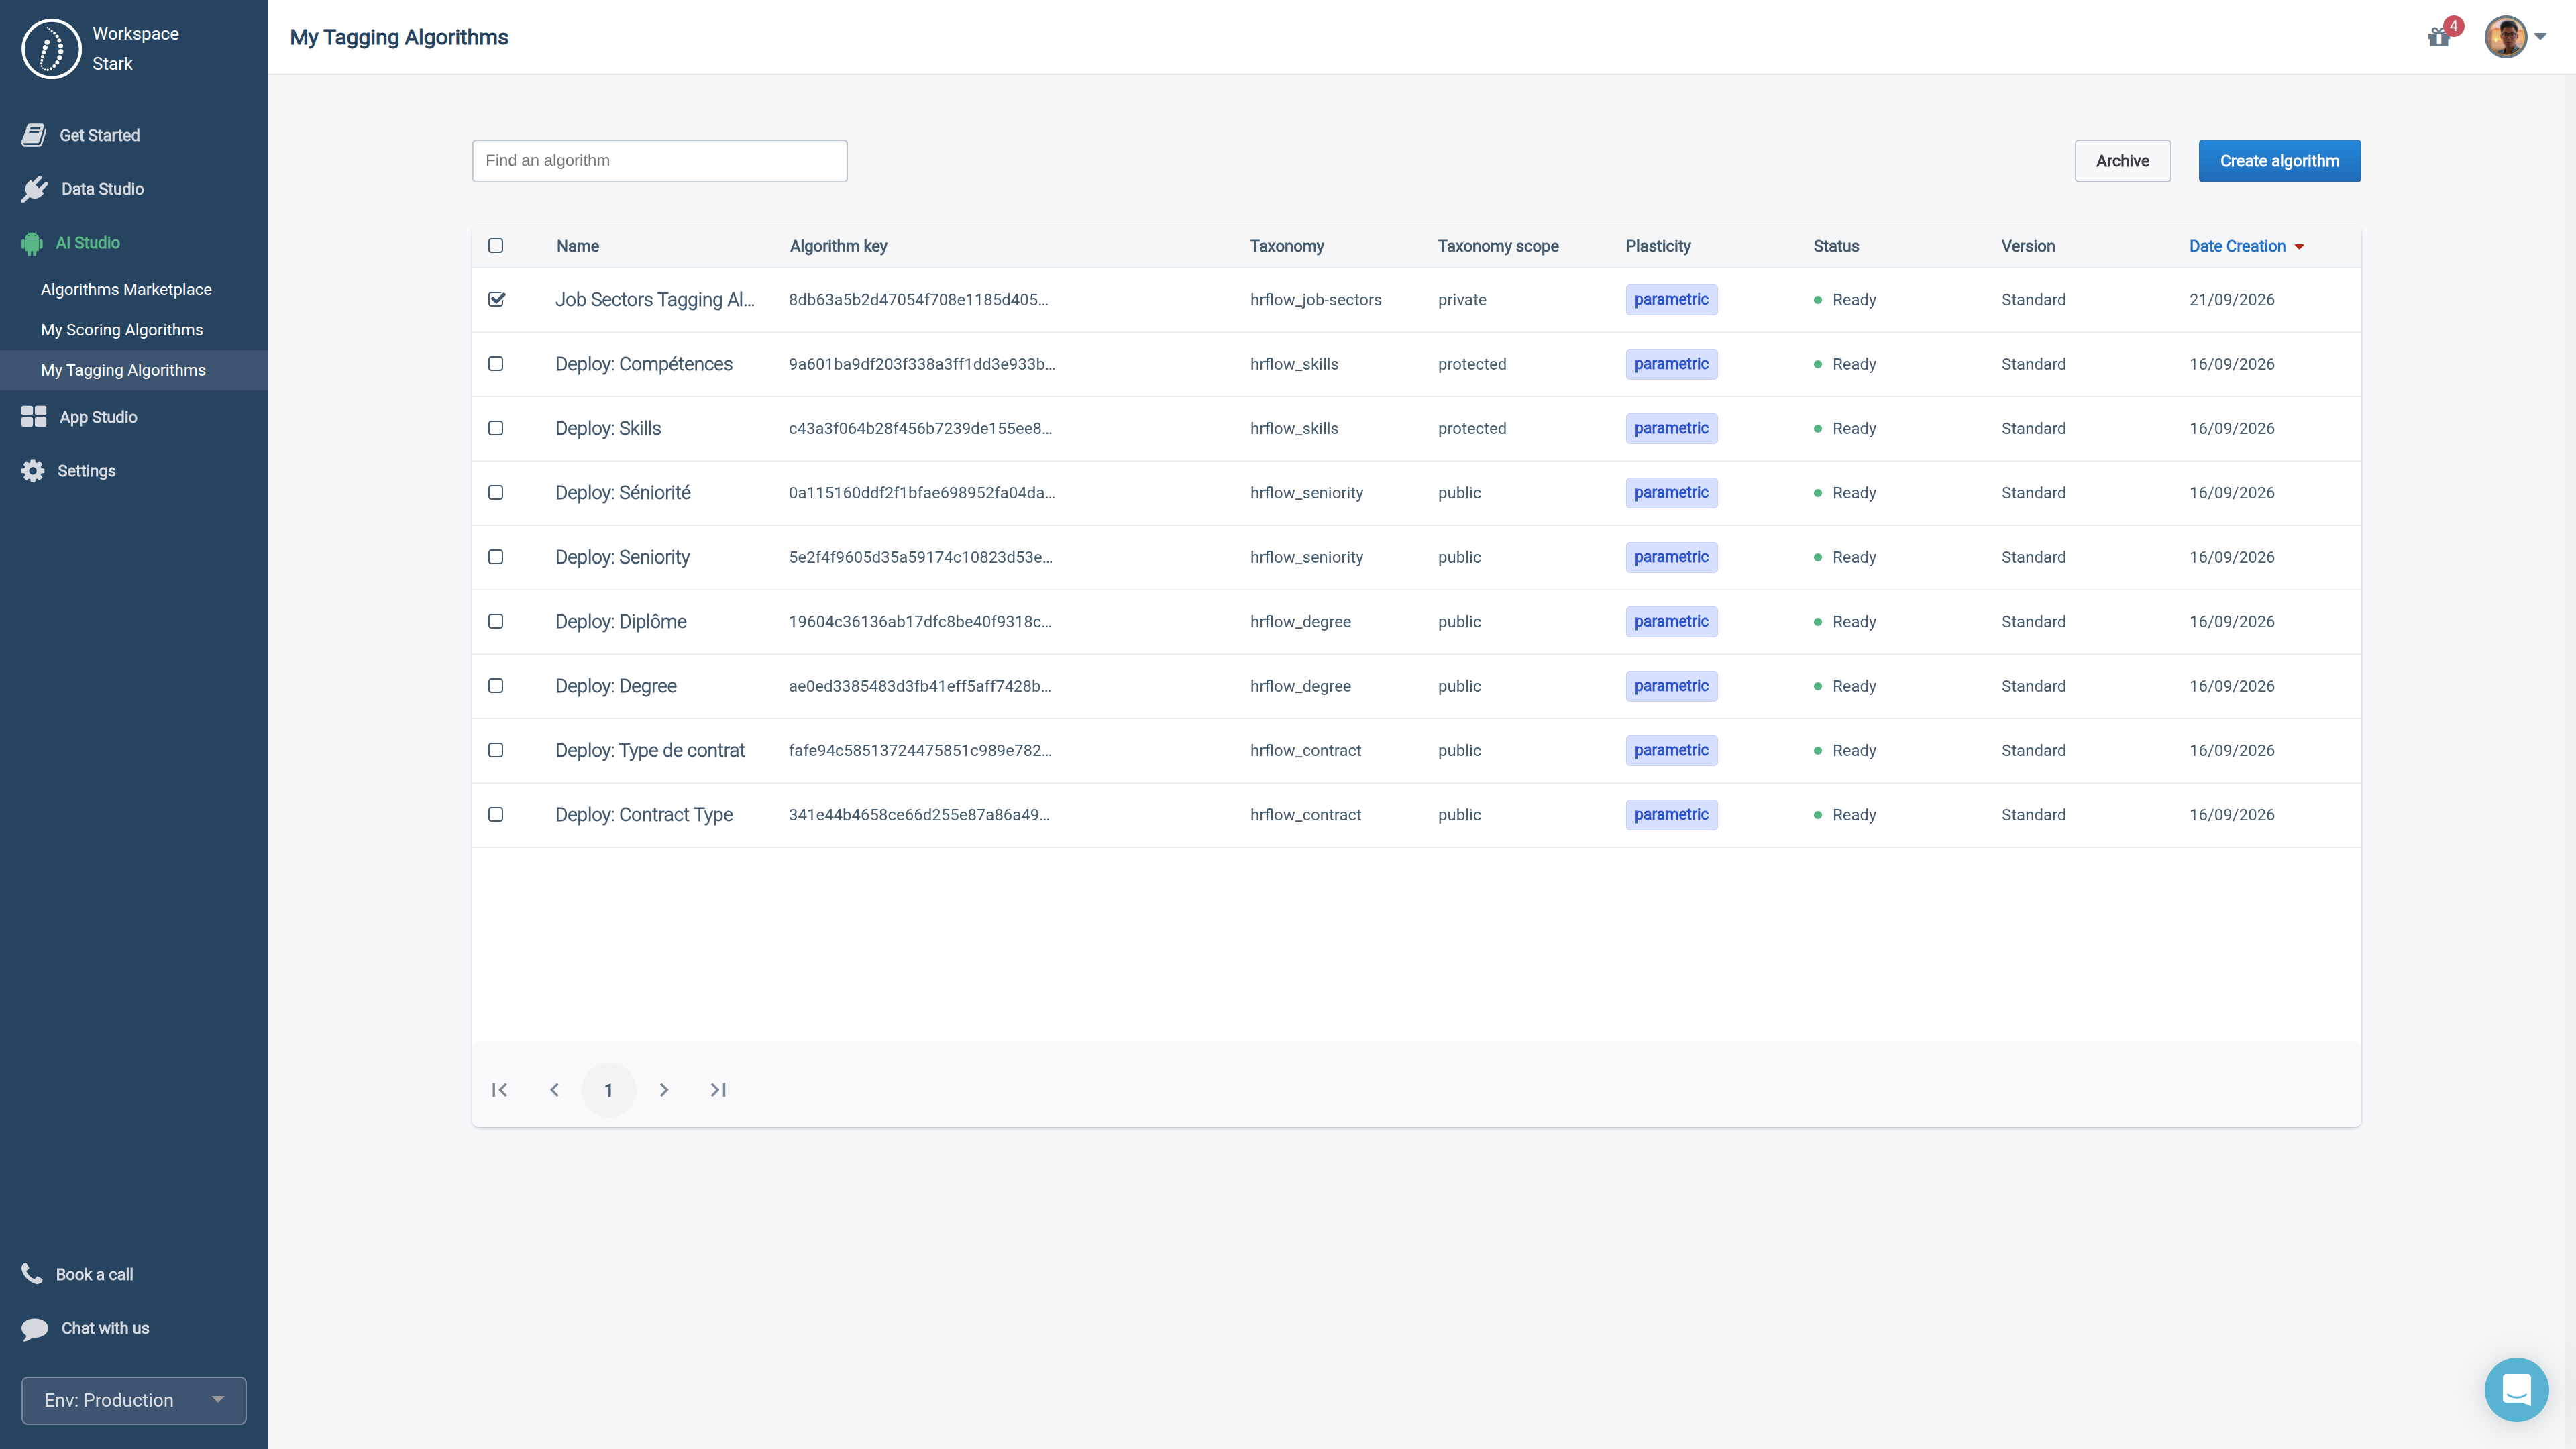
Taggers algorithms created in the workspace
Step 3: Deploy the algorithm
A Tagging Algorithm has to learn your taxonomy before it can be called. Open the algorithm and click Deploy. The deployment takes from a few seconds to a couple of minutes, depending on the number of tags. The algorithm page shows the indexing status and how many of your tags are indexed.
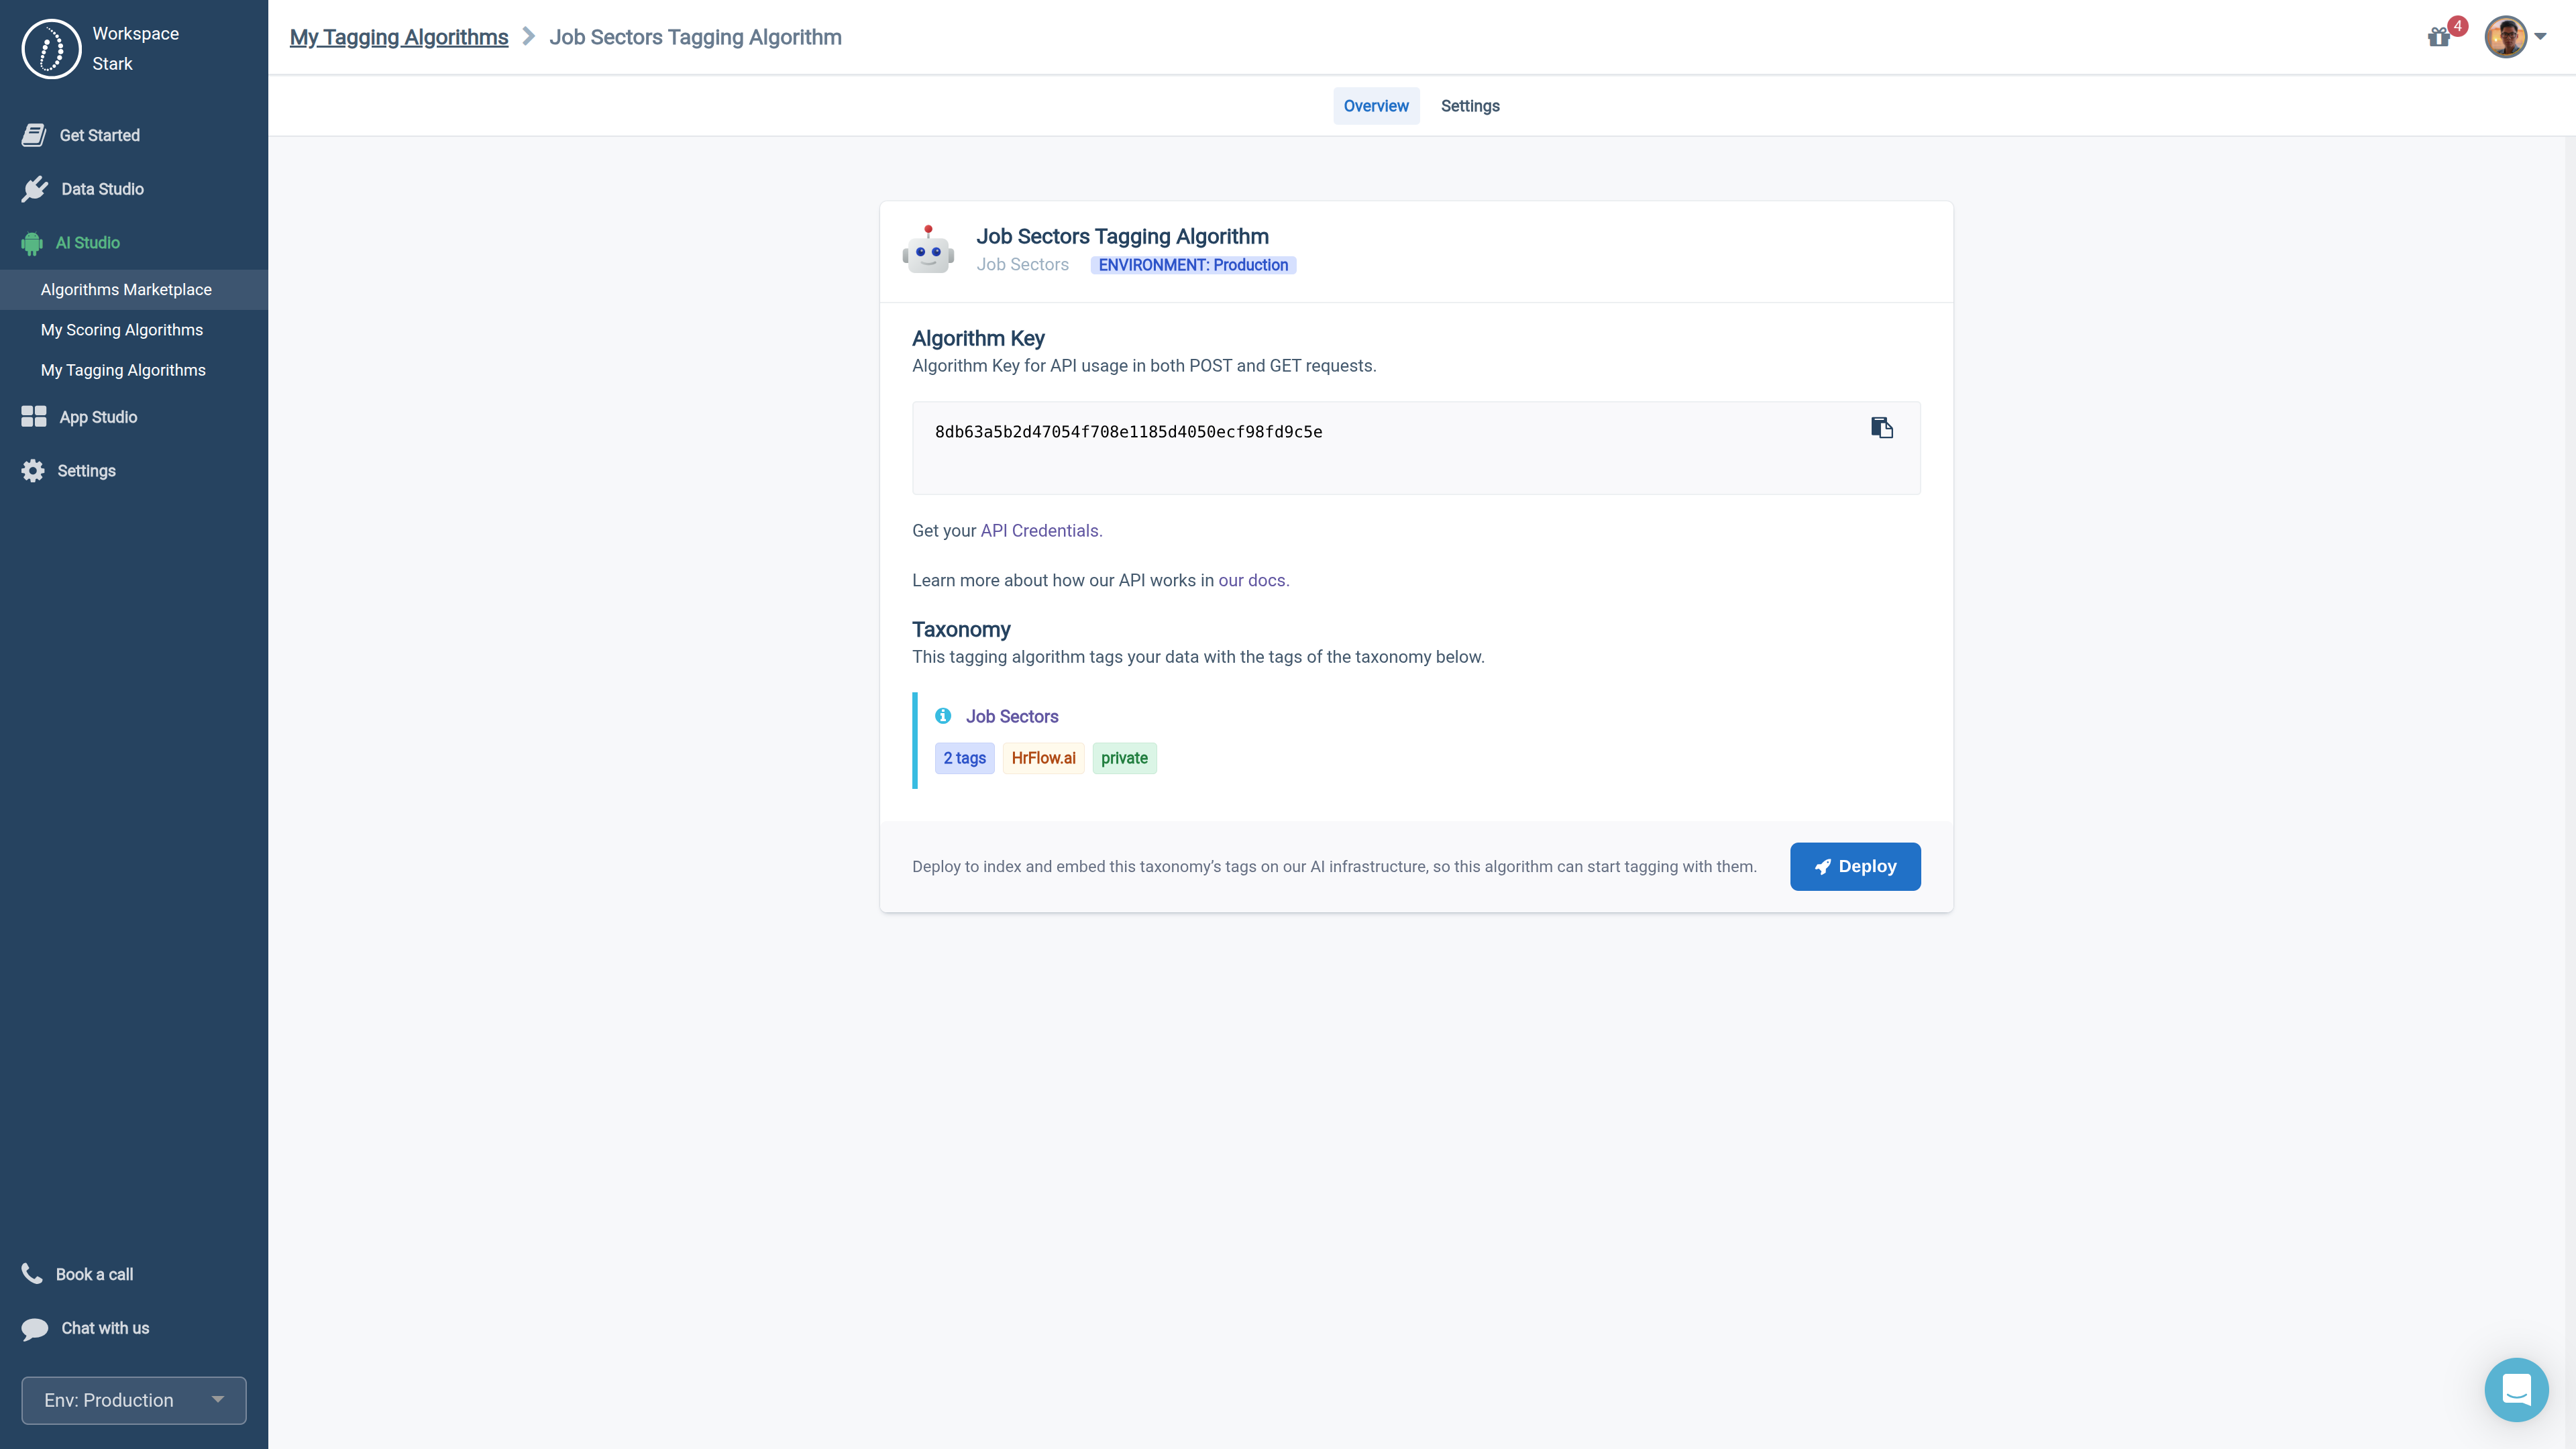
Tagger algorithm overview and deployment
Read-only taxonomies need no deploymentA Tagging Algorithm created on a read-only taxonomy (ROME Category, ROME Job Title, Skills) is ready as soon as it is created: the Marketplace taxonomy is maintained and deployed by its owner.
Large taxonomiesTaxonomies of several hundred tags cannot be deployed in one click. If yours is above the limit, the dashboard lets you reach out to the HrFlow.ai team, who will deploy it for you.
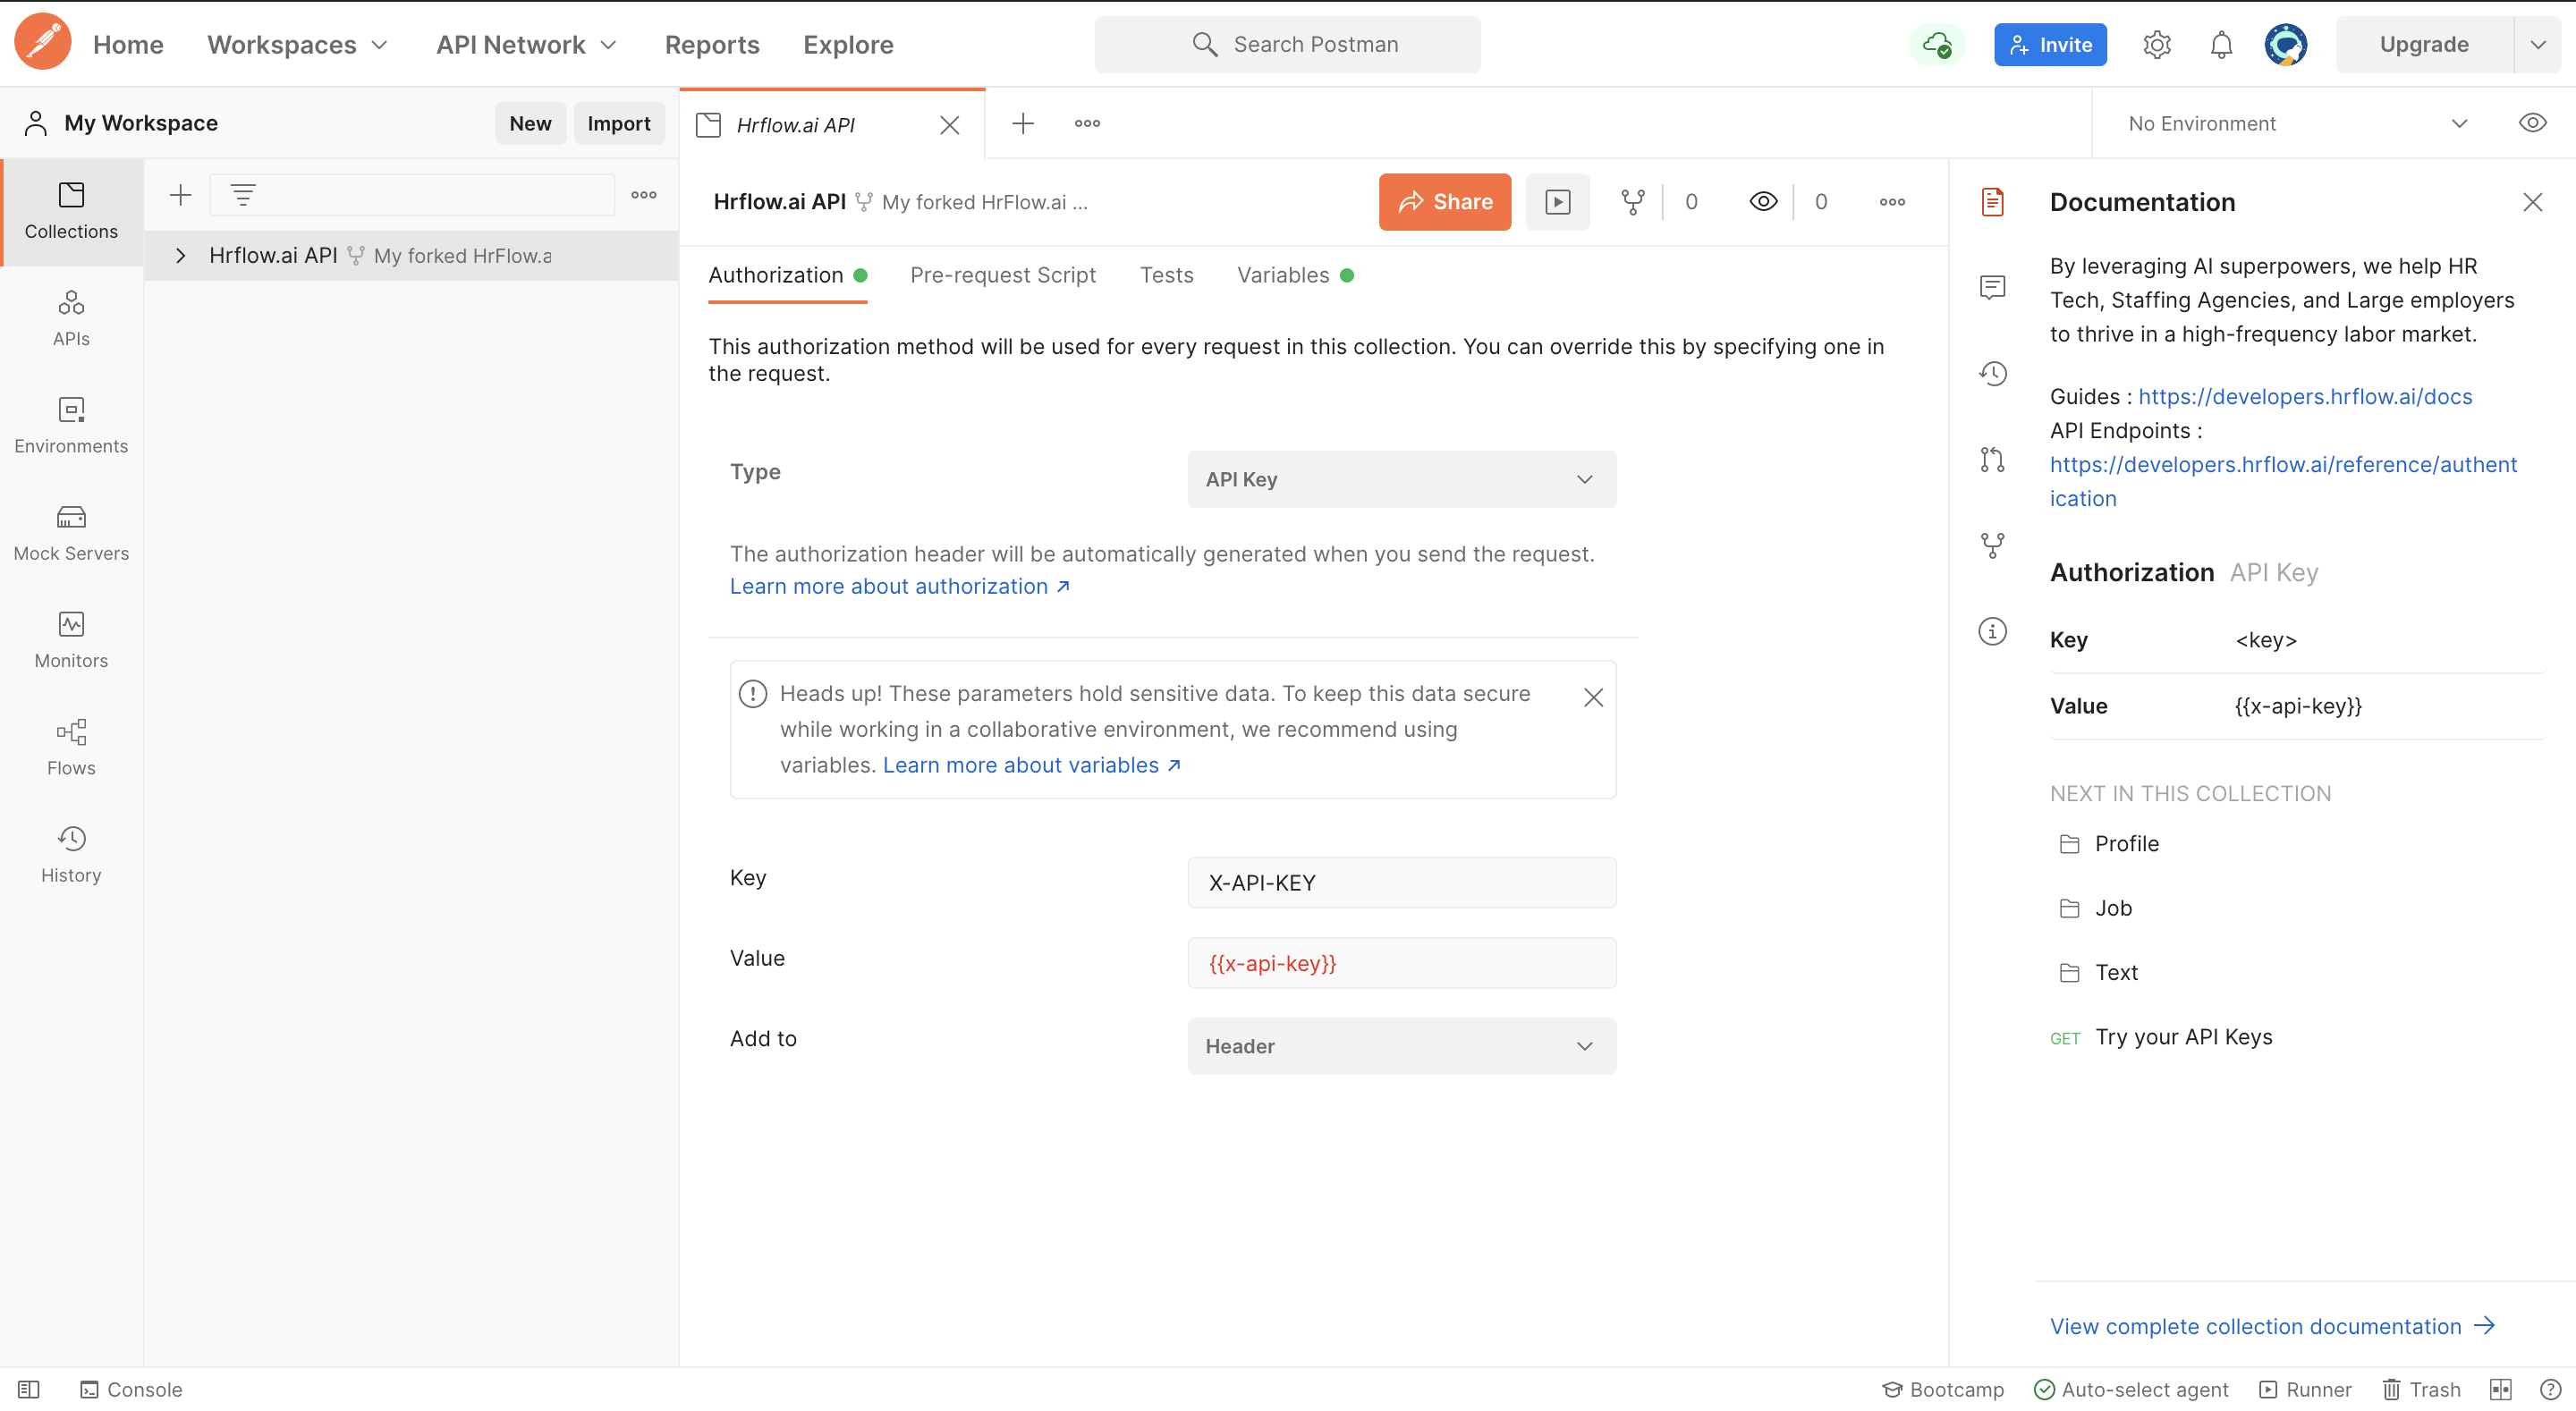
Step 4: Configure your Postman Environment
Following the steps from the HrFlow.ai Postman publication will make you land on this page:
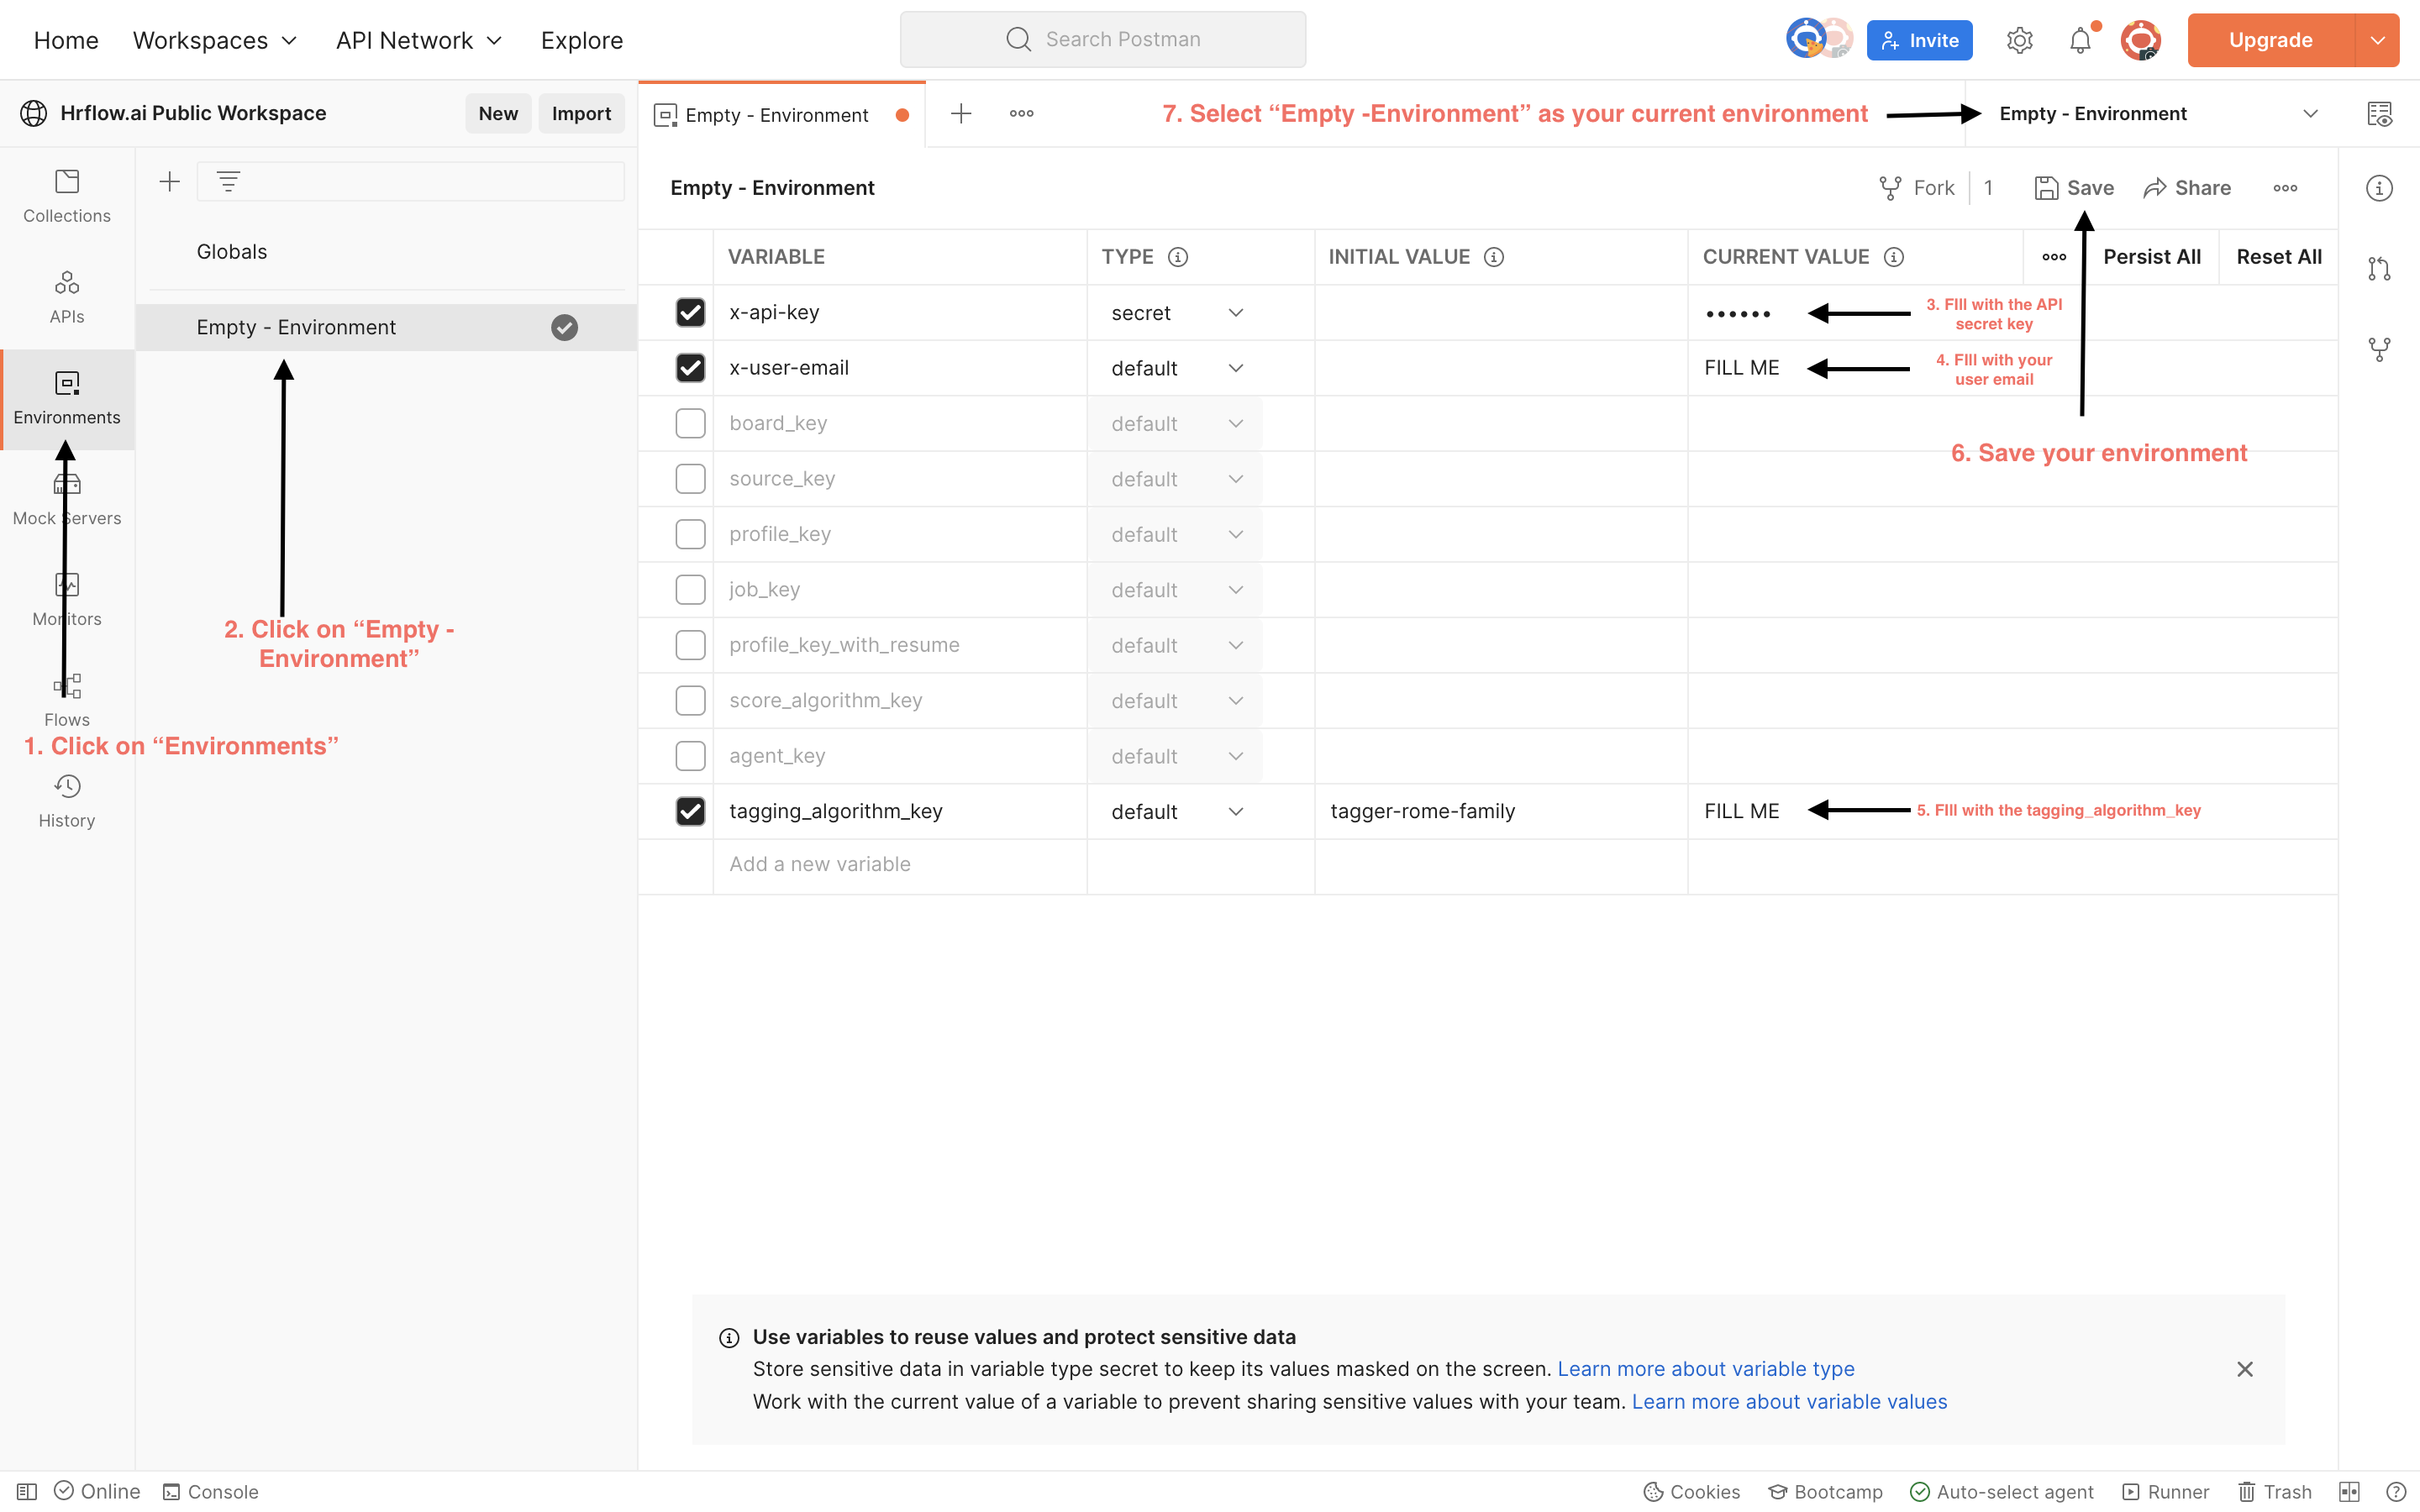
First, click on the "Environments" tab on the left side of your Postman window. Then, fill in the Empty - Environment template with the correct values. The compulsory variables for Tagging are:
X-API-KEY: follow the steps from 🔑 API Authentication to retrieve itX-USER-EMAIL: follow the steps from 🔑 API Authentication to retrieve it
Finally, save the environment and ensure that you selected Empty - Environment as your current environment.
Step 5: Get your First Tagging Results
Now that the environment is selected, we can test our first request to Tag a Text. To do so, fill in your body parameters in a raw format:
- [MANDATORY]
algorithm_key: the key of your Tagging Algorithm, shown in its Overview section. - [MANDATORY]
texts: the list of texts for which you want to assign some tags, up to 32 per request. - [OPTIONAL]
top_n: number of tags returned for each text. Defaults to1.
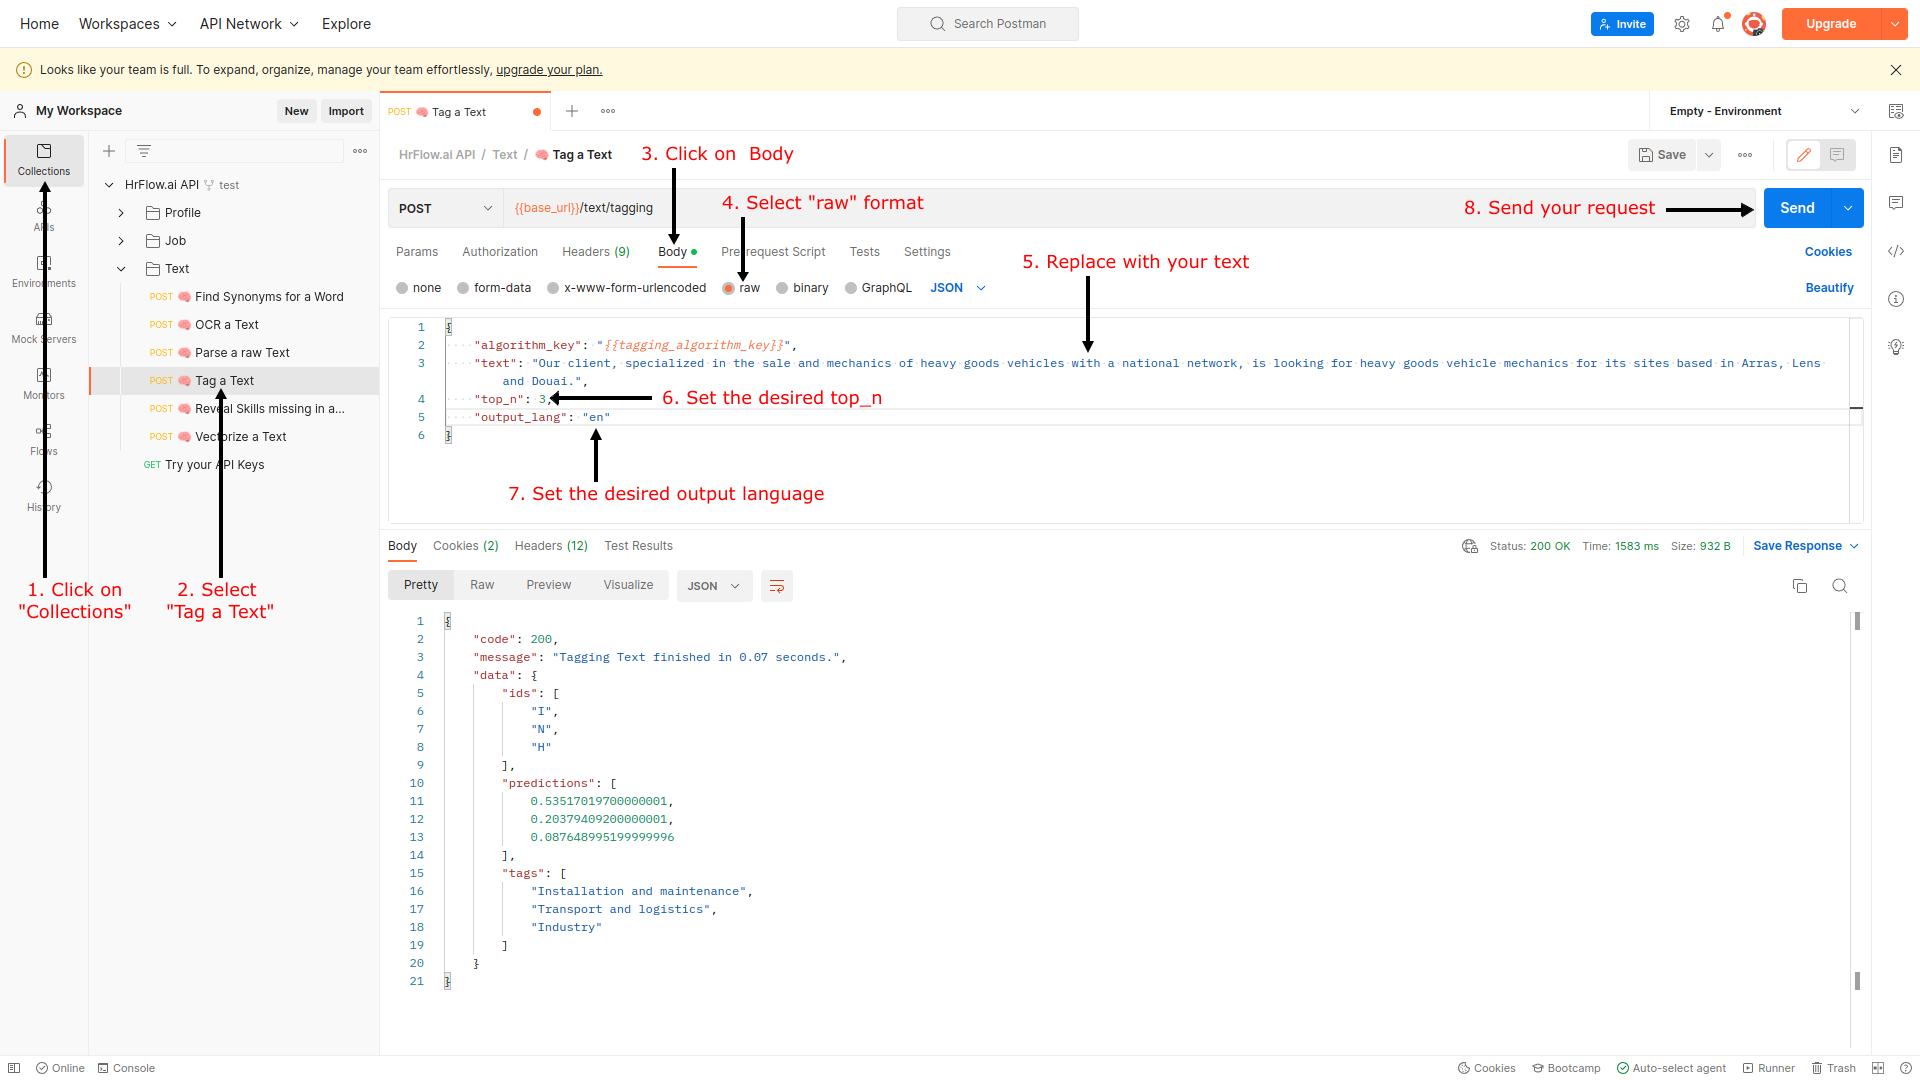
Postman Tagging Response
Let's break down the Tagging request's response. The field data of the response object contains one entry per text. Each entry contains three lists with the same length:
predictions: AI prediction scores sorted in descending ordertags: the labels of the predicted tags, in the language of your taxonomyids: the values of the predicted tags. For a fork of a ROME taxonomy, this is the ROME 4.0 code.
How to read the values in predictions?Both
predictions,tagsandidslists are synchronized. The n-th prediction is associated with the n-th tag.In our example above:
- Installation and maintenance scores at 0.53
- Transport and logistics scores at 0.20
Step 6: Keep your tagger in sync with your taxonomy
Editing a taxonomy does not change the deployed tagger by itself:
- After you add, rename or delete tags, open the algorithm and click Update to redeploy it. Until then, new tags are not predicted and the algorithm page shows fewer indexed tags than total tags.
- Archiving the algorithm removes the tagger; the taxonomy and its tags are kept.
- Deleting the taxonomy deletes its tags. Archive its algorithm first.
Advanced Topics
1. Try Tagging in your Favorite Programming Language
Once you have tried the request in Postman, you can directly convert it to work with your favorite programming language. Here is an example with Python and the module Requests.
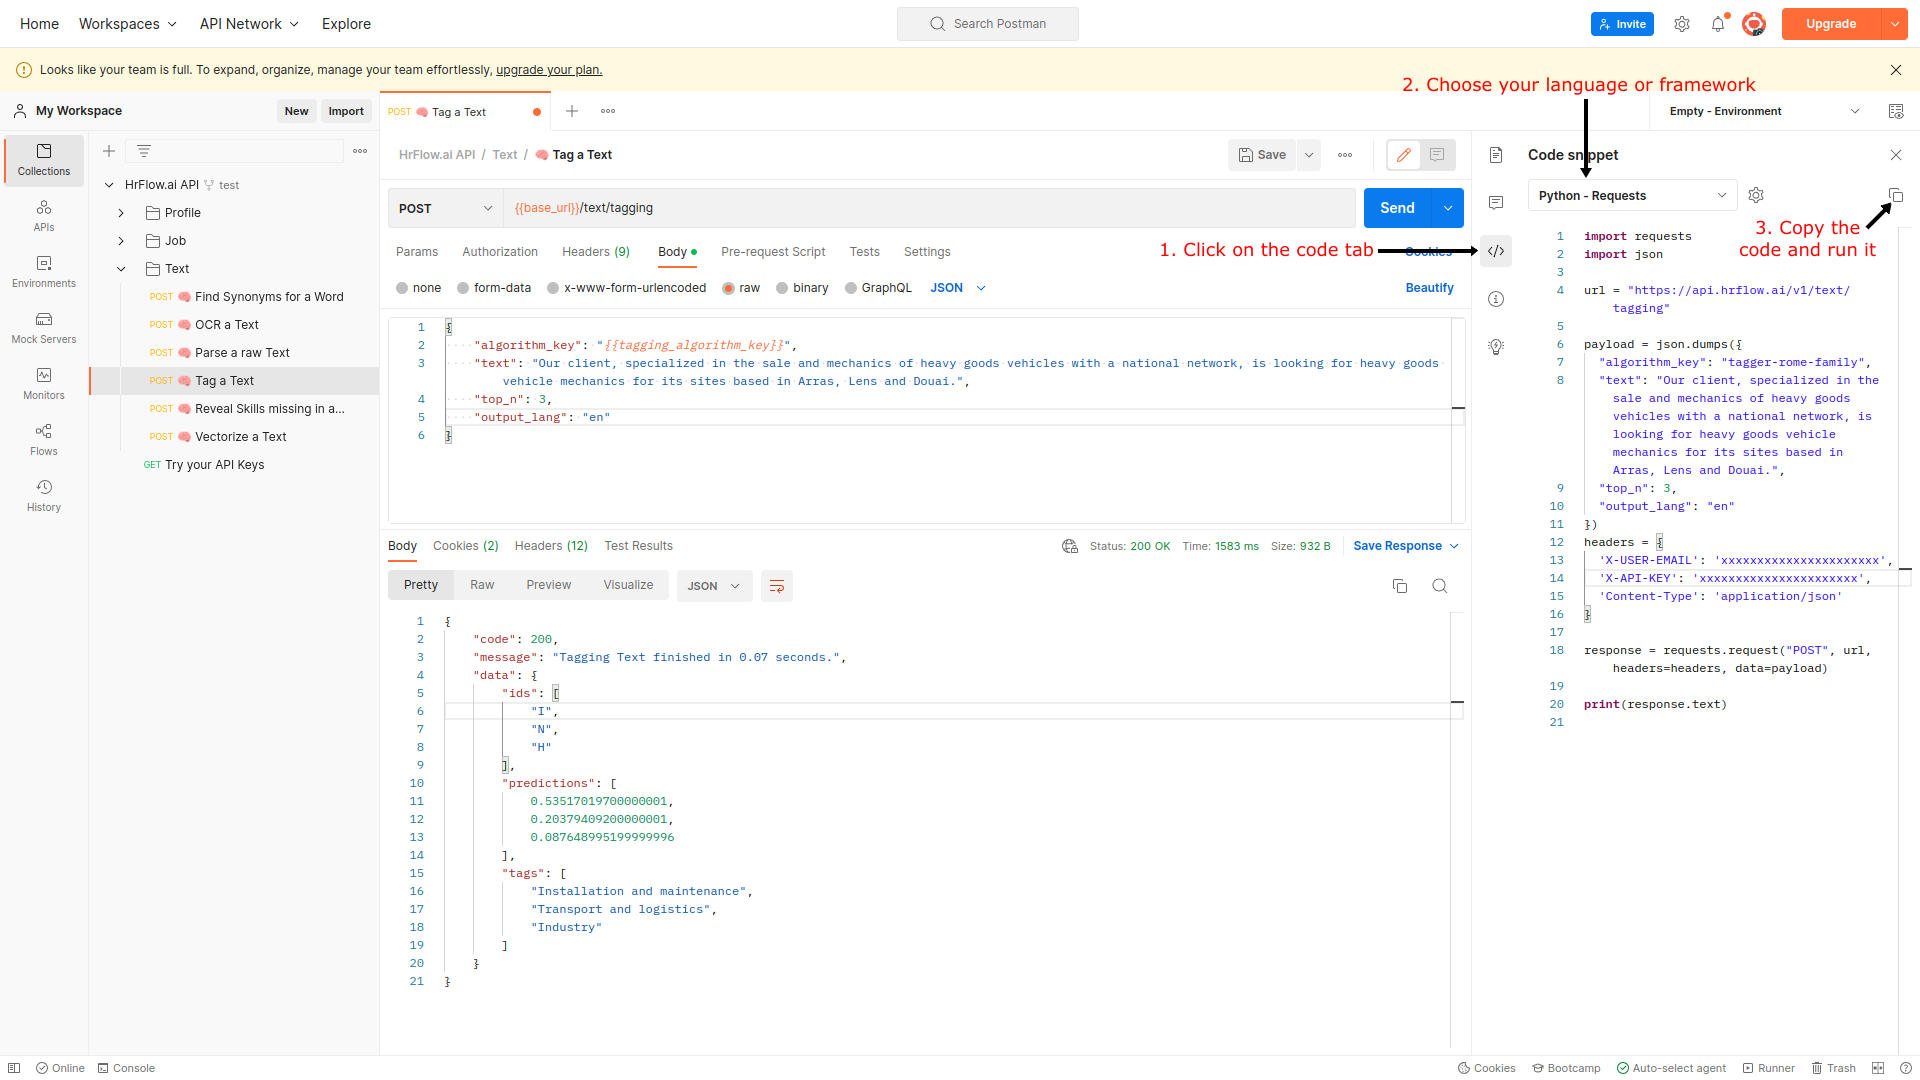
import requests

url = "https://api.hrflow.ai/v1/text/tagging"

payload = {
  "algorithm_key": "YOUR-ALGORITHM-KEY",
  "texts": [
    "Our client, specialized in the sale and mechanics of heavy goods vehicles with a national network, is looking for heavy goods vehicle mechanics for its sites based in Arras, Lens and Douai."
  ]
  "top_n": 3,
}
headers = {
  'X-USER-EMAIL': 'YOUR-USER-EMAIL',
  'X-API-KEY': 'YOUR-API-KEY',
  'Content-Type': 'application/json'
}

response = requests.request("POST", url, headers=headers, json=payload)

print(response.text)
2. Manage Taxonomies through the API
Everything you did in Step 1 can also be done programmatically with the Taxonomies endpoints:
- ⭐ Create a taxonomy (pass
base_taxonomy_keyto copy one of ours), - ⭐ Create a tag,
- ⭐ Update a taxonomy to replace a whole tag set at once, and the other Taxonomies endpoints of the API reference.
3. Tag against Ad-hoc Labels with the Dynamic Tagger
When you only need to sort texts into a handful of labels, you do not have to create a taxonomy or an algorithm. tagger-hrflow-dynamic takes the labels in the request itself.
import requests

url = "https://api.hrflow.ai/v1/text/tagging"

payload = {
  "algorithm_key": "tagger-hrflow-dynamic",
  "texts": [
    "Data Insights Corp. is seeking a Senior Data Scientist for a contract-to-direct position. The CDI arrangement offers a pathway to a full-time role.",
    "DataTech Solutions is hiring a Data Scientist for a fixed-term contract of 12 months, with the possibility of extension."
  ],
  "top_n": 1,
  "dynamic_labels": ["CDI", "CDD"],
  "dynamic_context": "The CDI is a Contrat à Durée Indéterminée, an open-ended or permanent employment contract. The CDD is a Contrat à Durée Déterminée, a fixed-term or temporary employment contract."
}
headers = {
  'X-USER-EMAIL': 'YOUR-USER-EMAIL',
  'X-API-KEY': 'YOUR-API-KEY',
  'Content-Type': 'application/json'
}

response = requests.request("POST", url, headers=headers, json=payload)

print(response.text)dynamic_labels: the list of labels to choose from. Keep it short (up to 32 labels); for anything larger, create a taxonomy and a Tagging Algorithm.dynamic_context: optional text that explains the labels to the model. It significantly improves results when labels are acronyms, internal jargon or overlap in meaning.top_ncannot exceed the number of labels.- In the response,
idsare the positions of the labels indynamic_labels.
Dynamic tagger or Tagging Algorithm?The dynamic tagger is ideal for prototyping and one-off classifications. Once your labels are stable, or grow beyond a few dozen, a Tagging Algorithm gives you faster and more consistent predictions, stable identifiers, and a taxonomy you can manage over time.
Extended Language SupportOur taggers support 43 languages, including: Afrikaans, Albanian, Arabic, Bengali, Bulgarian, Catalan, Chinese, Croatian, Czech, Danish, Dutch, English, Estonian, Finnish, French, German, Greek, Hebrew, Hindi, Hungarian, Indonesian, Italian, Japanese, Korean, Latvian, Lithuanian, Macedonian, Nepali, Norwegian, Persian, Polish, Portuguese, Romanian, Russian, Slovak, Slovenian, Spanish, Swedish, Tagalog, Thai, Turkish, Ukrainian, Vietnamese.
Keep an eye on our blog (https://blog.hrflow.ai/) and our product notes (https://updates.hrflow.ai/) to stay in touch with our latest taggers.
Updated 24 days ago